COMPASS Operations Training
Lesson
0 Introduction to COMPASS Operations Training Program


COMPASS Operations provides organisations with a user-friendly and systematic approach to identifying legislation that applies to its assets or processes, and for recording evidence of compliance.
In this training course, you will learn:
- What COMPASS Operations is used for
- How to access the tool and the legislative information it contains
- How to review changes to legislation
- How to update compliance evidence in COMPASS
How to take this course:
You can take the course in any order you choose, although we recommend going through the course in order to help better understand the inner workings of COMPASS Operations.
Every lesson in this course has an "All steps" tab that can be found underneath the lesson video. There you will find all of the steps covered in the video depicted with screenshots and descriptions.
Use the "All steps" tab if you decide to come back to this course and refresh your memory about a specific feature or element that you feel unsure about.
Against each step, you will find a time-stamp that shows you where in the video that specific instruction was covered - use this whenever you wish to see a video demonstration.
If you have any questions, regarding this training program, you can always contact us using our contact form or by emailing us to info@westoncompliance.com
This lesson contains no instructional parts, as this is simply an introduction to the COMPASS Operations training program.
In this lesson, you are going to learn how to set-up and access the COMPASS Operations tool.
Key Takeaways:
- How does the system-generated email invitation work
- How to set up an account with COMPASS Operations
- How to access COMPASS Operations after logging in
- How to choose an asset within COMPASS
If you have any questions, regarding this training program, you can always contact us using our contact form or by emailing us to info@westoncompliance.com
(0:07)
1) Once you have been set up as a COMPASS User, you will receive a system-generated email inviting you to create an account.

(0:15)
2) You will need to click on the link provided.

(0:20)
3) This will take you to the sign-up page where you enter your email address and set up a password.

Note that your email address will also be your Username.

(0:30)
4) Once you have set up a passsword, you will be directed to the Login page for COMPASS.

(0:35)
5) Bookmark this page on your browser so that you can easily return to it. The URL address to the login page is crew.westoncompliance.com

(0:48)
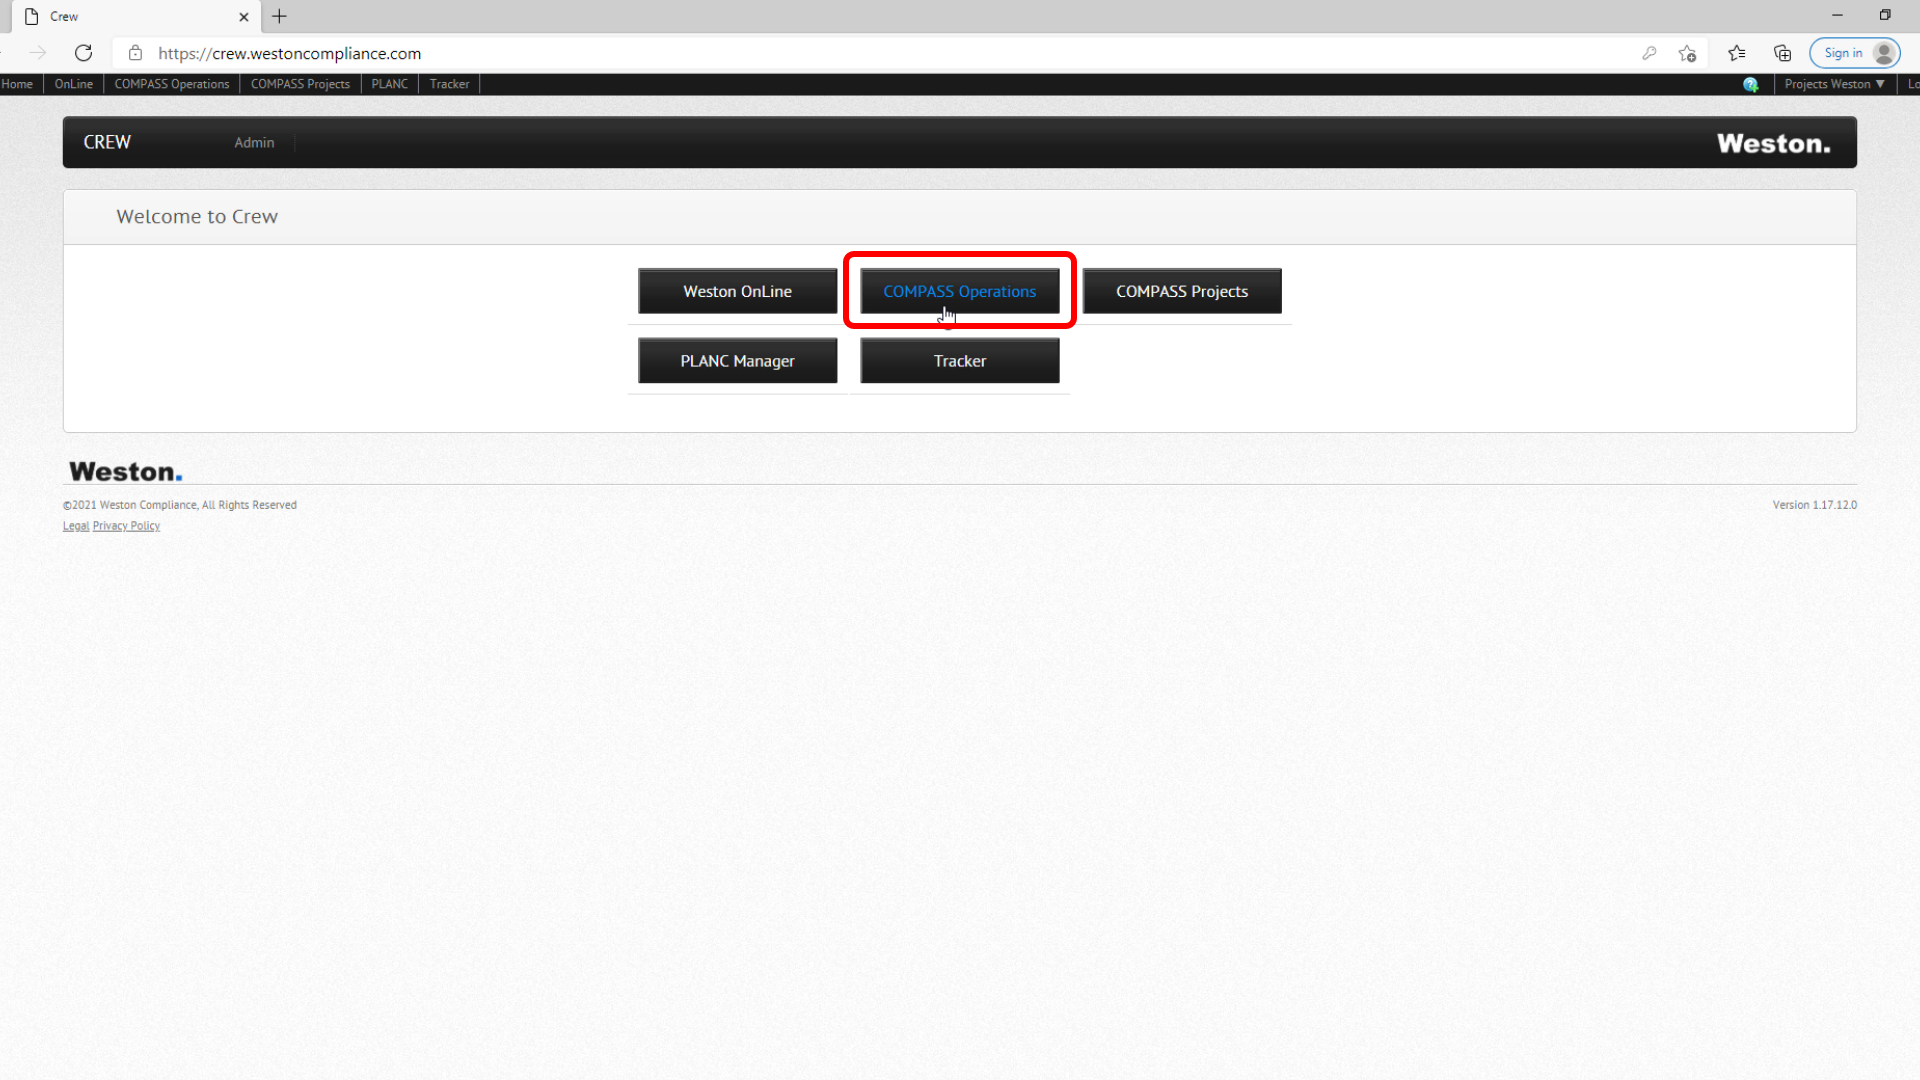
6) Once logged in, you should select COMPASS Operations, which appears in the centre of your screen.
(0:53)
7) This will take you to your organisation's COMPASS Operations dashboard.

(1:00)
8) If your organisation has more than one asset set up in then you can choose which asset to view by mousing over COMPASS Operations in the black ribbon and then selecting from the drop down menu that appears.

(1:13)
9) Alternatively, you can do this using the Assets button.

In this lesson, you are going to learn how to use the COMPASS Overview screen.
Key Takeaways:
- What is the COMPASS Overview screen
- How to use the quick filters function
- How to find legislation justification for removal
- How to use the show/hide column function
- How to discount legislation from the register or bring back items that have been previously marked as "Not required"
- How to sort the overview screen table
- How to use the search function
If you have any questions, regarding this training program, you can always contact us using our contact form or by emailing us to info@westoncompliance.com
(0:07)
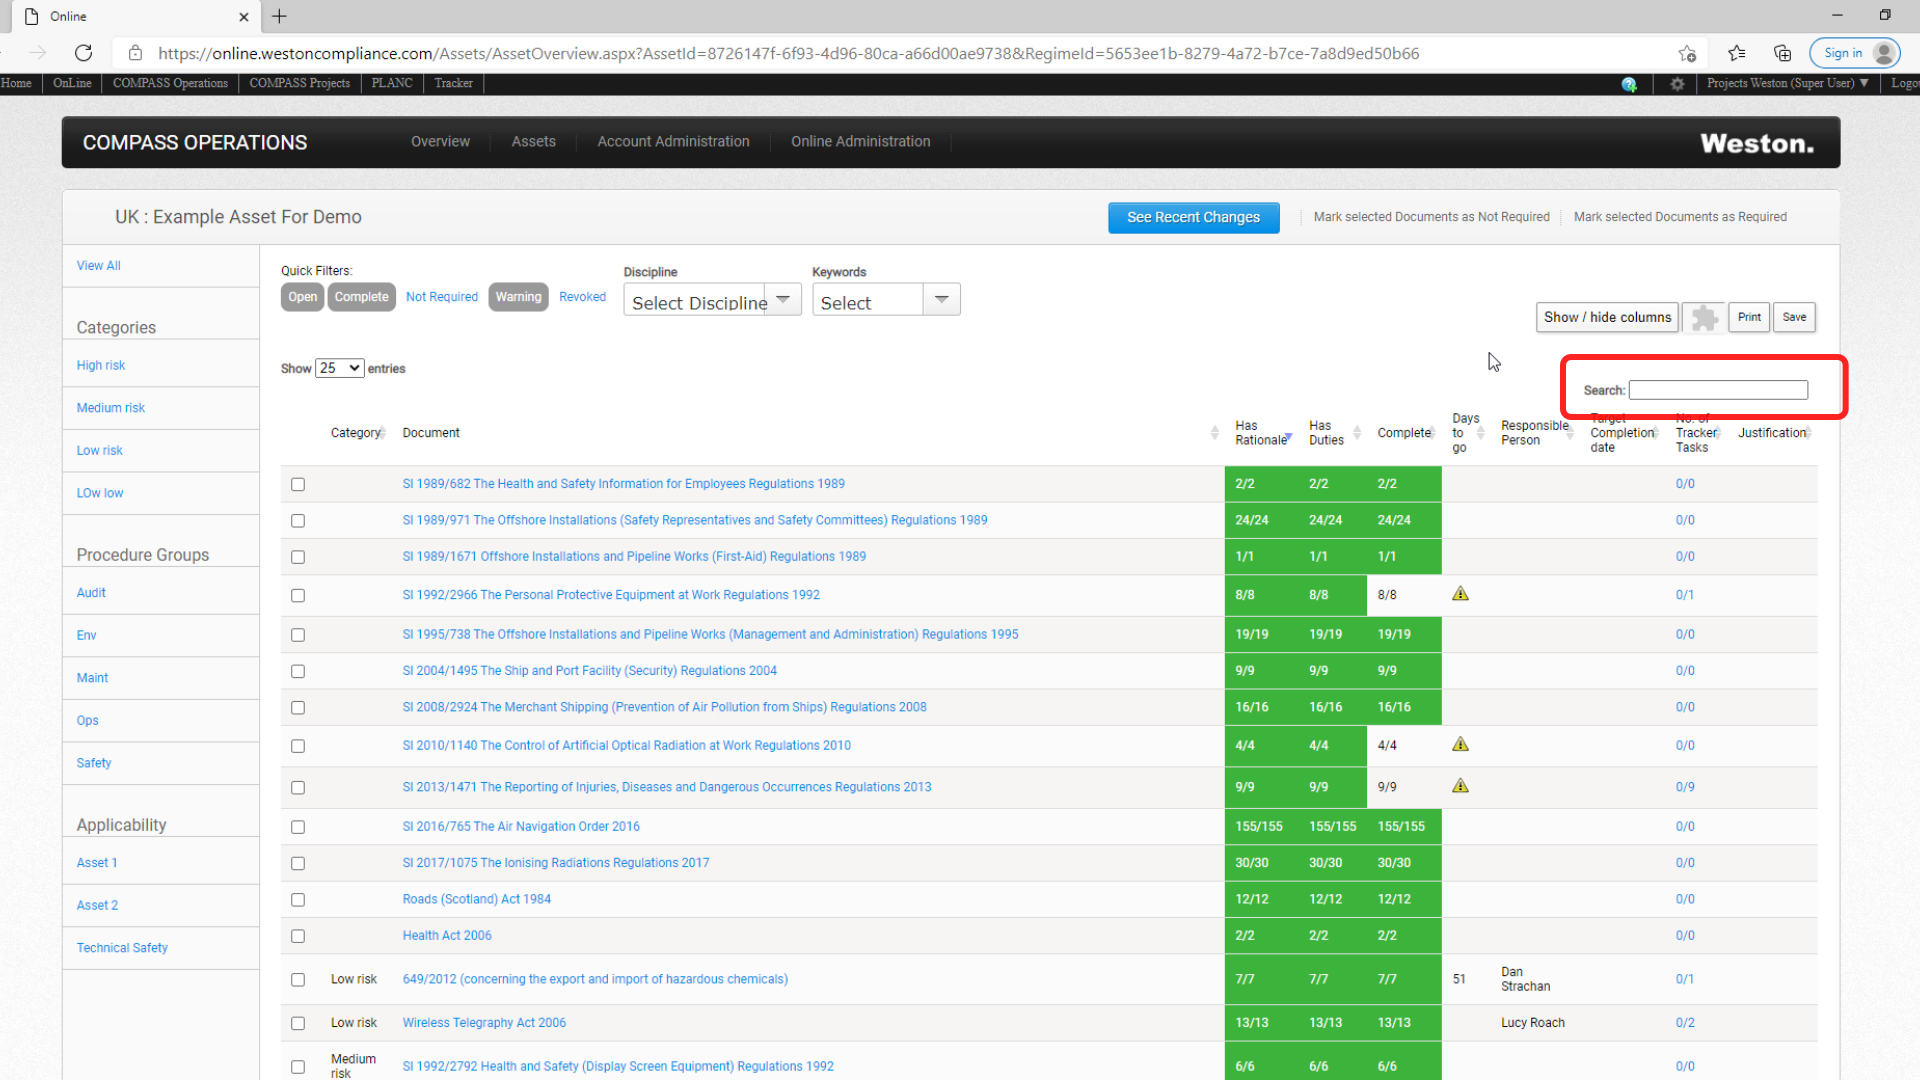
1) The COMPASS Overview screen is the main dashboard that you see when using the COMPASS Operations platform.

(0:14)
2) Here you can see a full list of relevant legislative items - Acts, Statutory Instruments and EU Regulations - that apply to your organisation.

(0:25)
3) The columns titled "Has rationale" and "Has Duties" become green when these details are entered into the register.

(0:34)
4) The column headed Complete becomes green when Evidence of Compliance is entered and committed to the system.

(0:46)
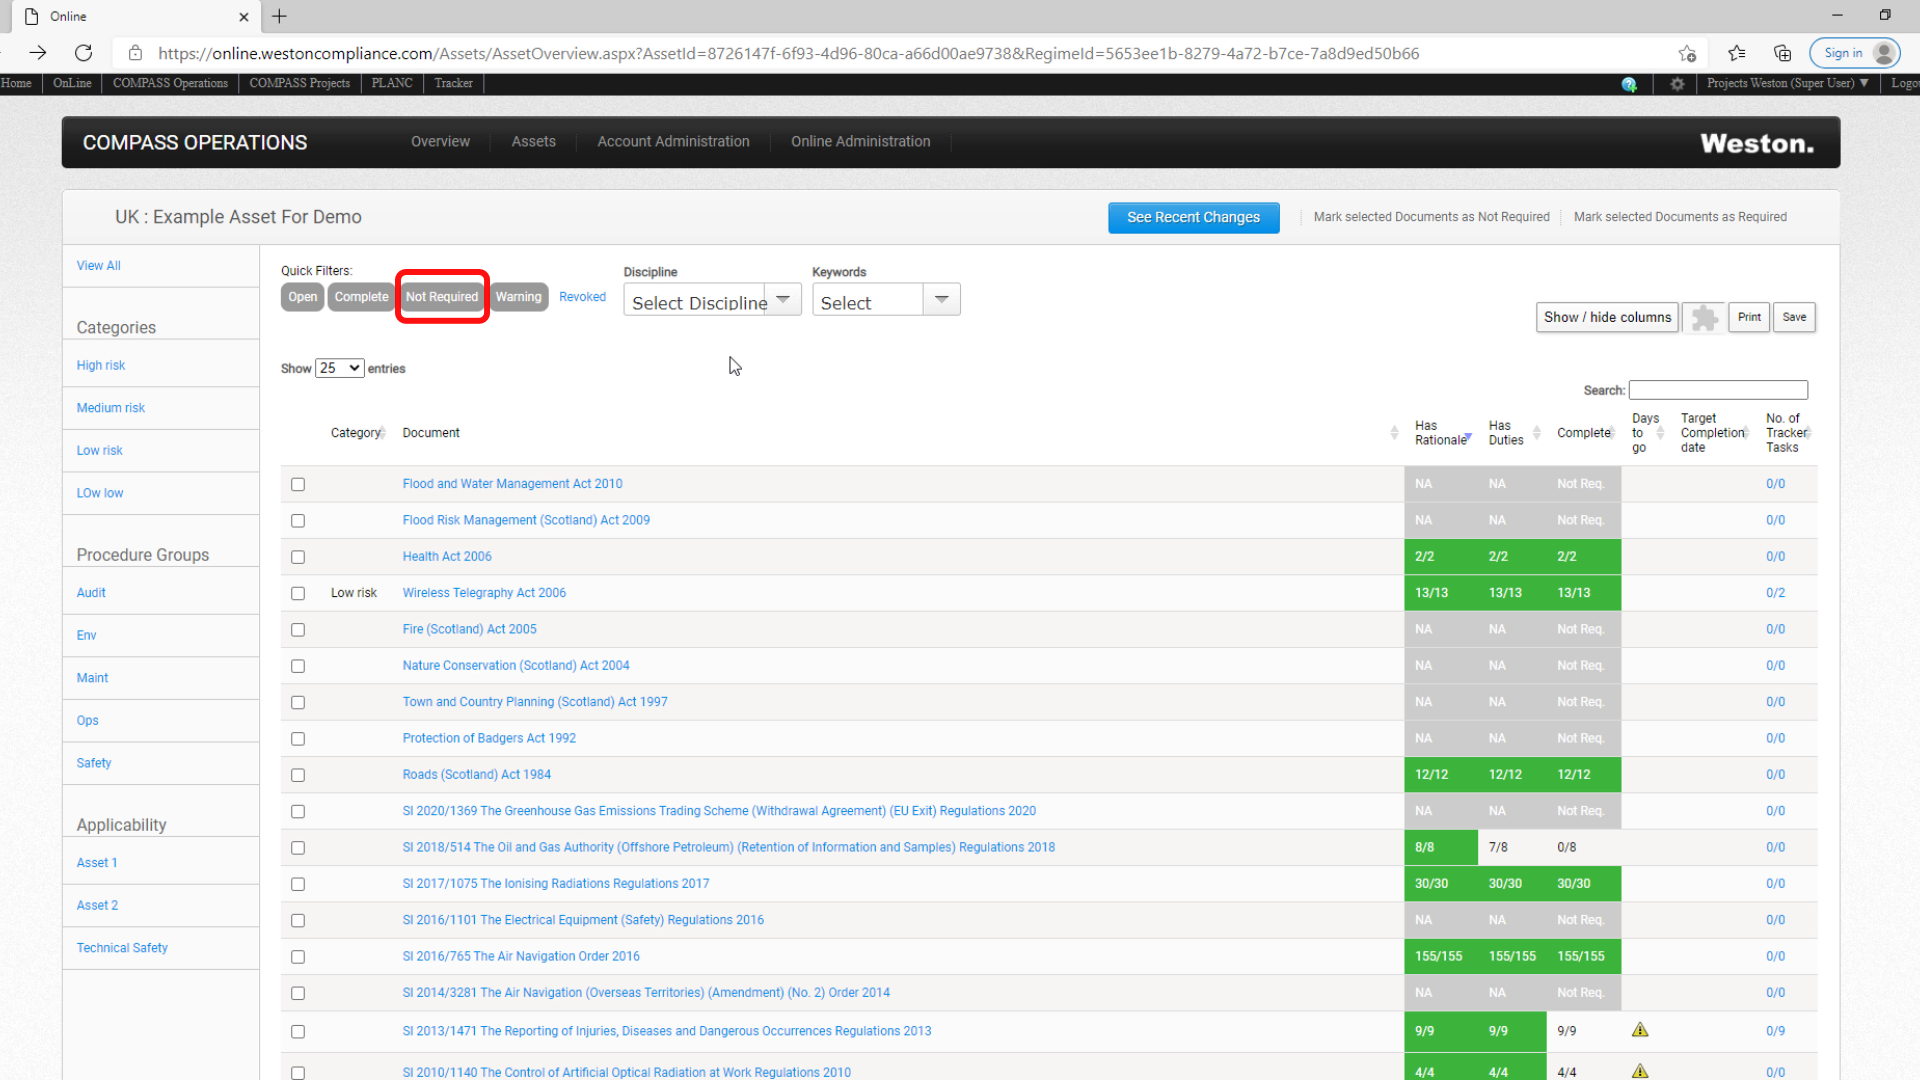
5) The quick filters are used to see legislation which has been marked as "Not Required".

(0:46)
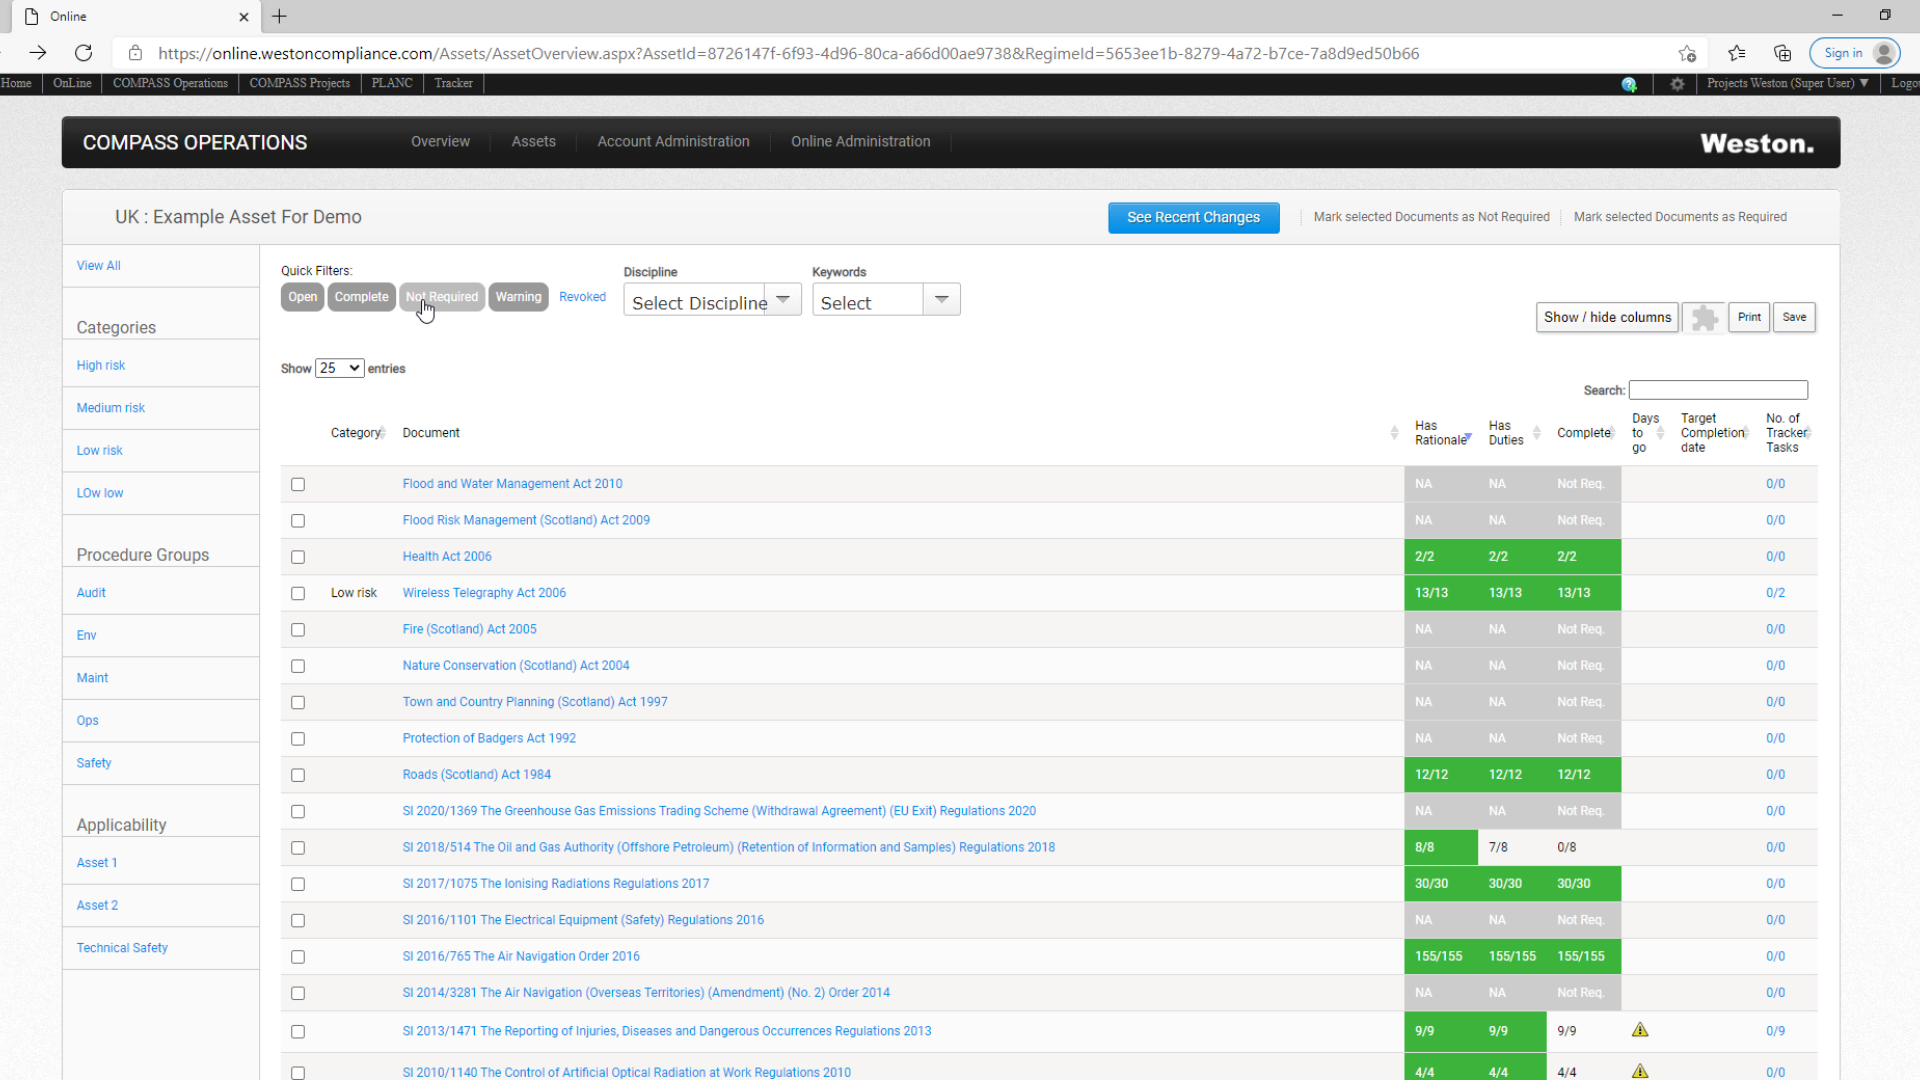
6) After clicking the not required button the system will show the user all the pieces of legislation that have been discounted from the register.
(1:03)
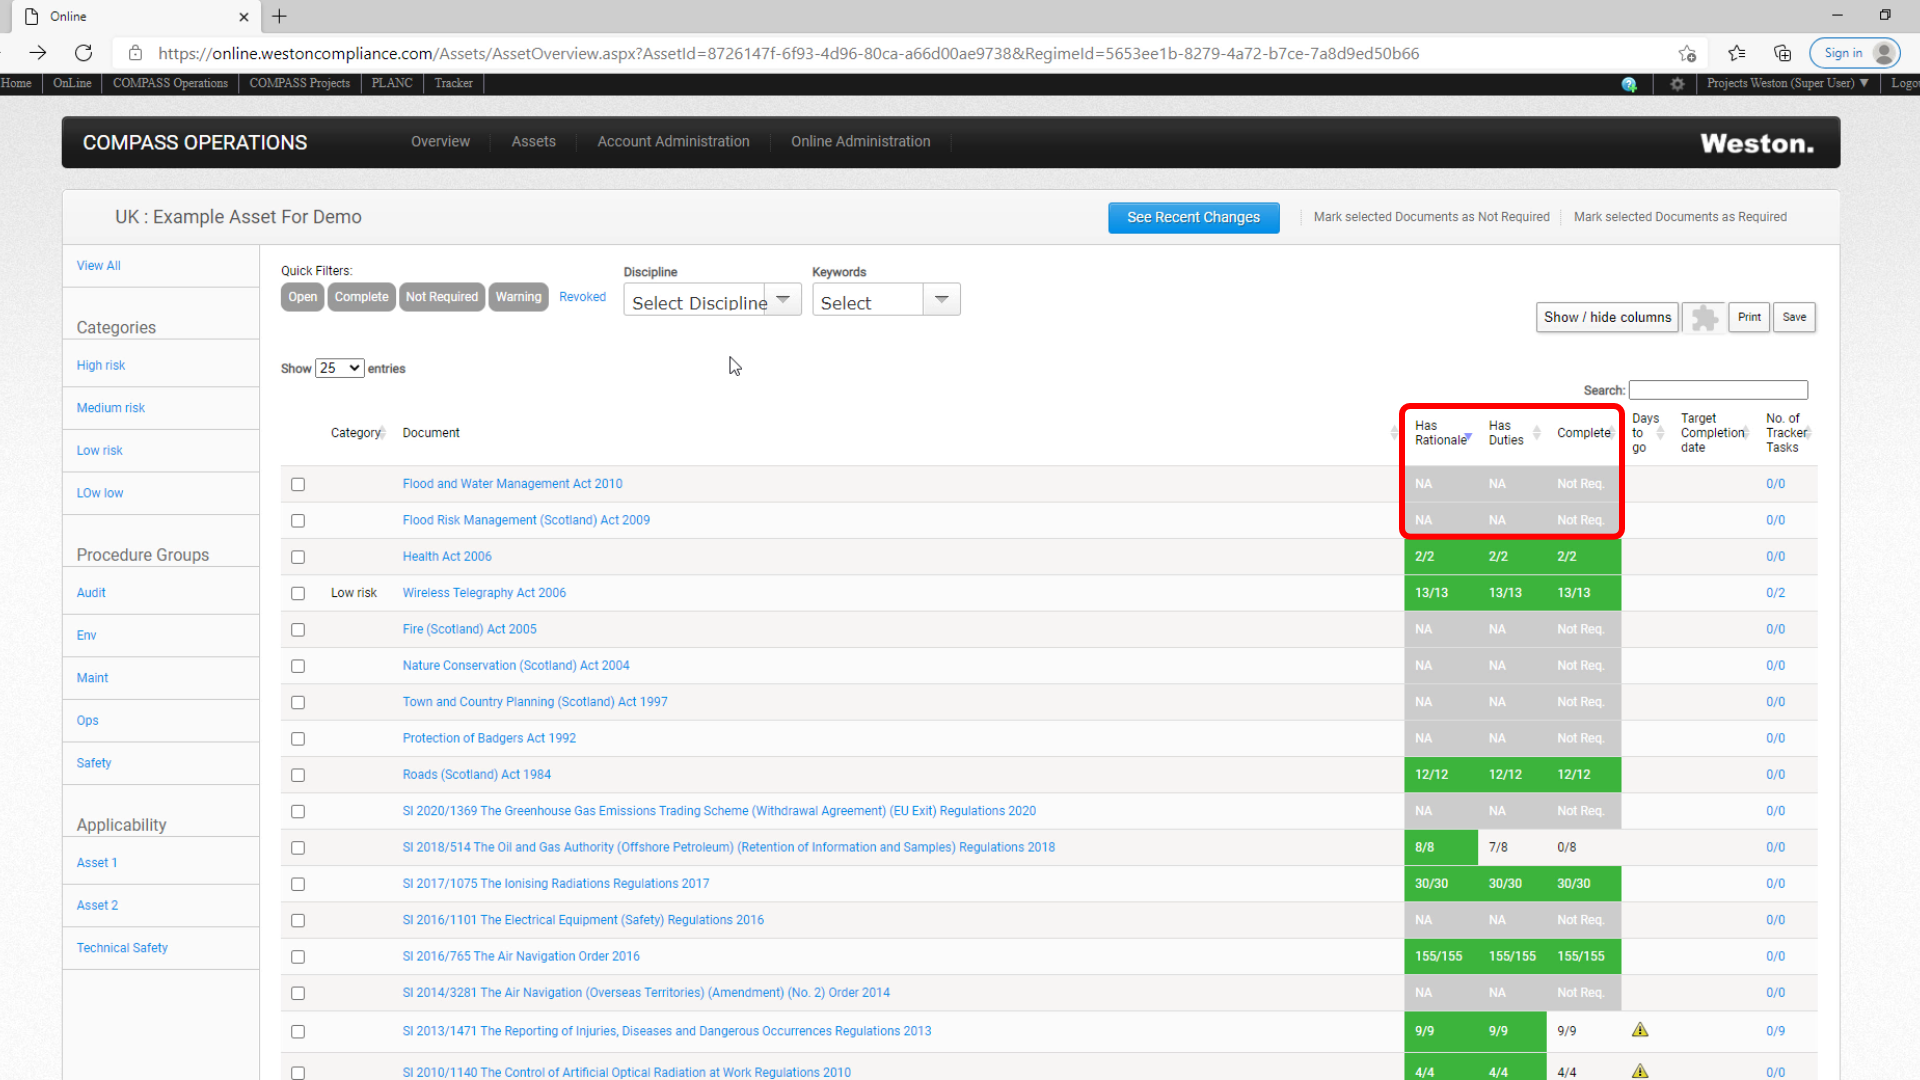
7) As a visual signal, the rationale, duties and complete columns of such legislation are coloured in grey.
(1:10)
8) Whenever the Not Required filter is active the button is also highlighted in a grey colour.
(1:17)
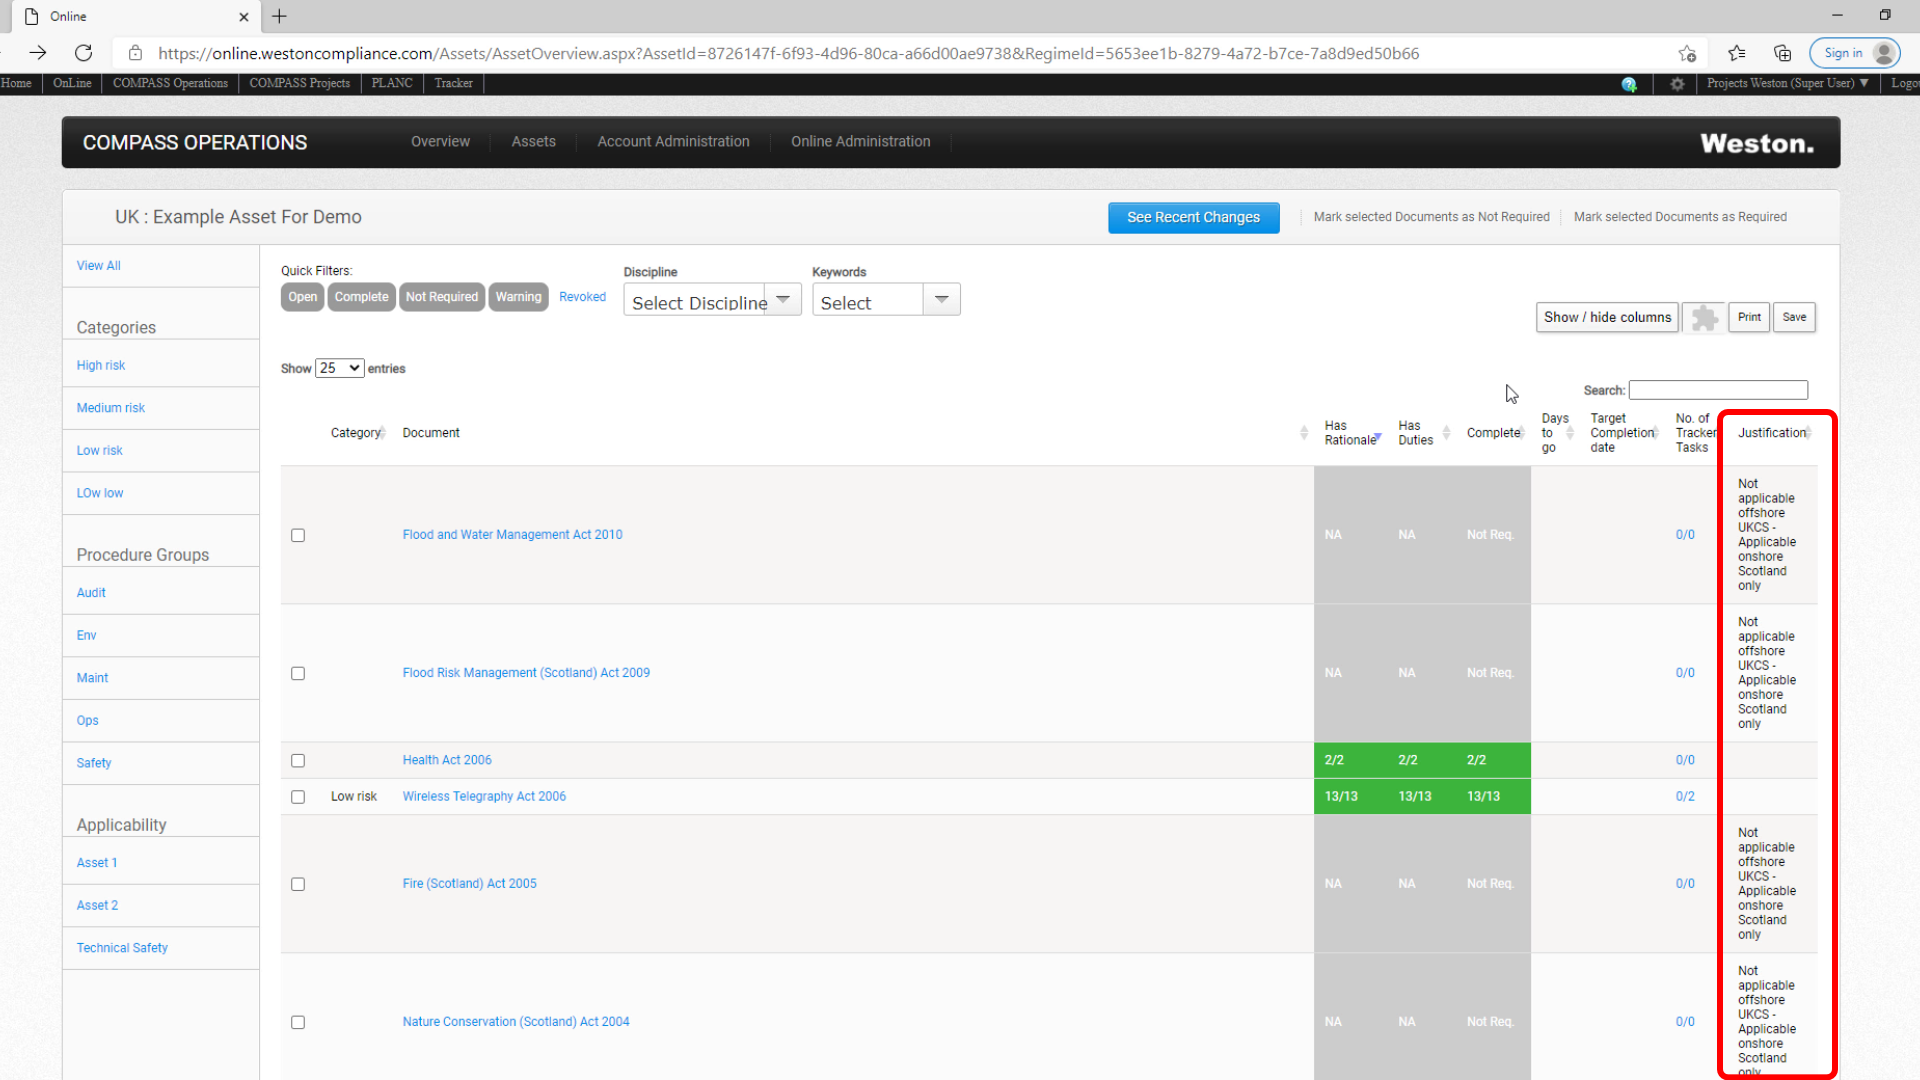
9) You can then use the Show/Hide Columns function to review the Justification as to why a particular regulation has been deemed not to be relevant.

(1:27)
10) To do so, select the "Justification" option from the drop down menu.

(1:34)
11) This will prompt another column to appear on the overview screen titled "Justification", where an explanation as to why a particular regulation has been discounted from the registe, is provided.
(1:48)
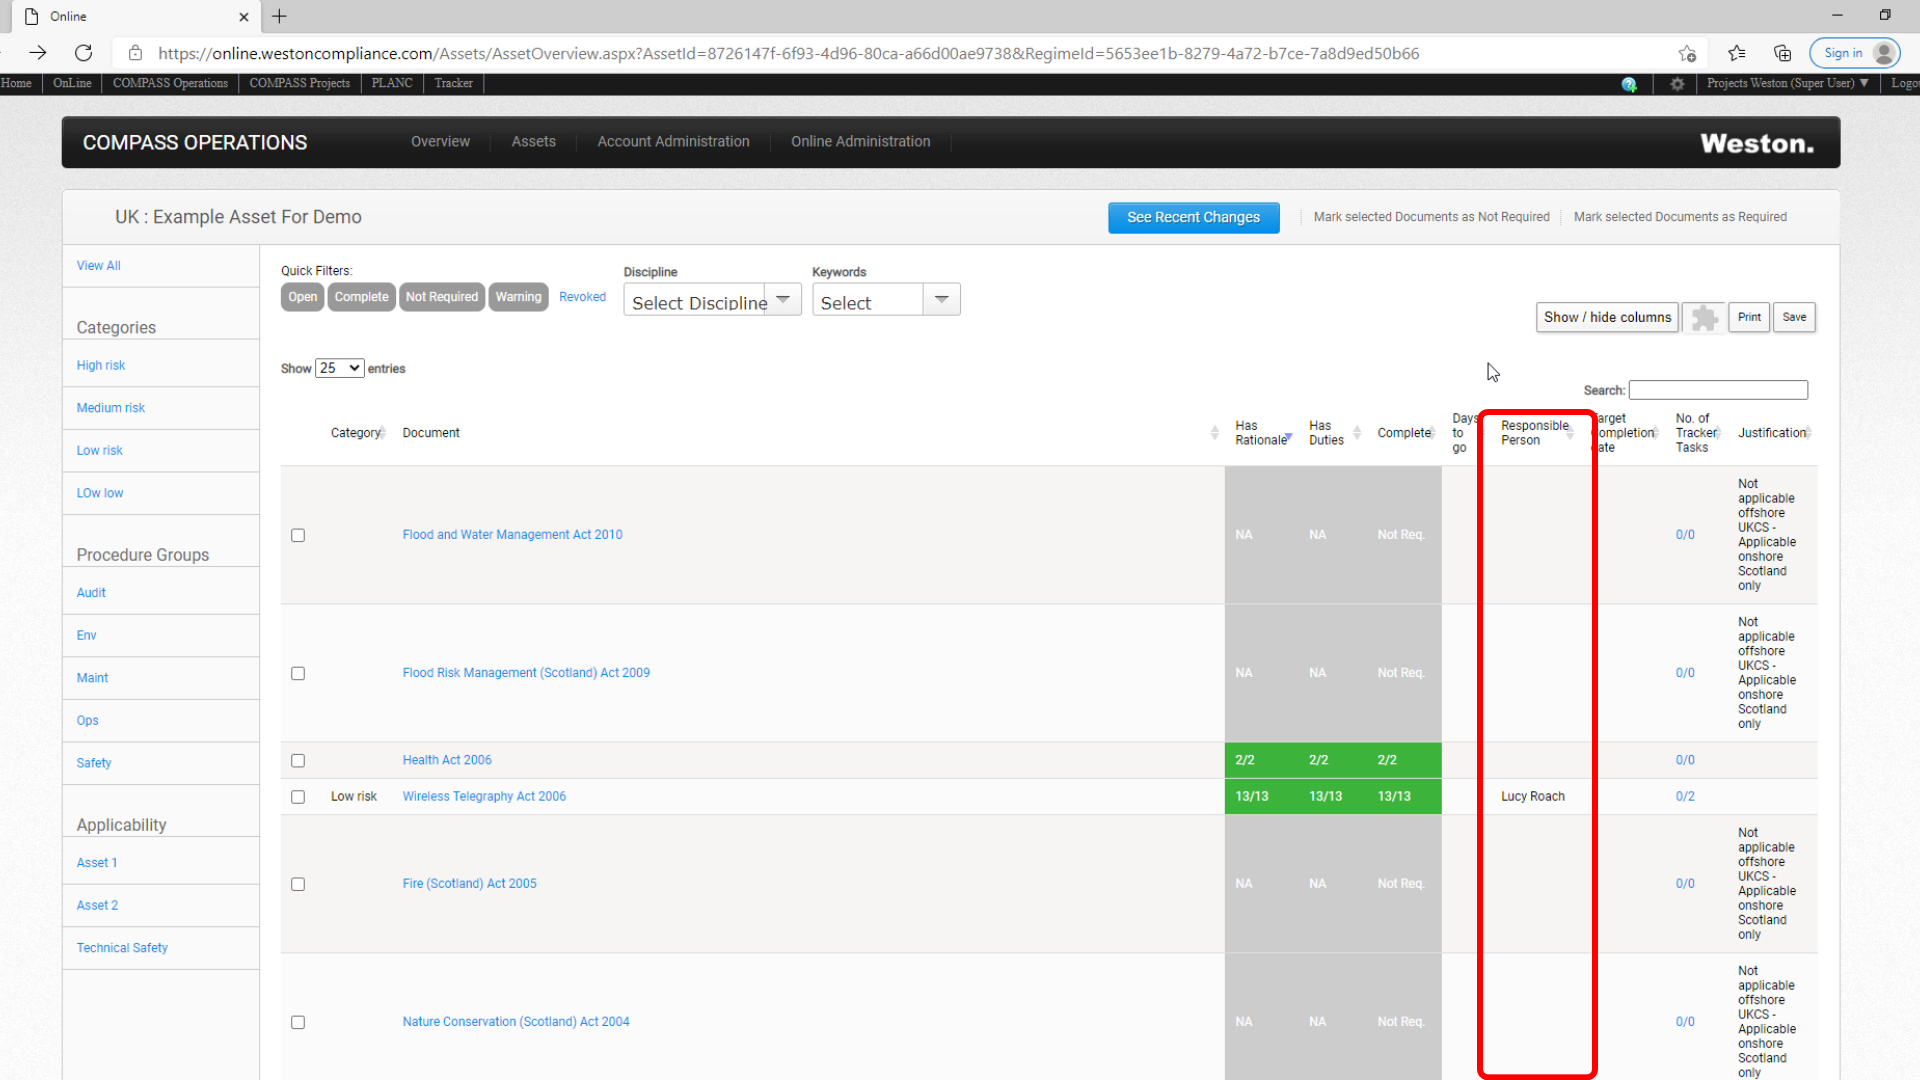
12) The Show/Hide Columns function also allows you to select the particular information that you wish to see on the COMPASS Overview screen.

(1:56)
13) For example, if you want to see the responsible person against each legislation listed. You can do so by ticking the "Responsible Person" option from the drop down menu.

(2:05)
(2:11)
14) The Mark Selected Documents as Not Required and the Mark Selected Documents as Required function allows you to remove legislation that is not relevant to your organisation's assets or activities. Or to bring back into the live register any item that has been marked as "Not Required".

(2:28)
15) To do this, you check the box in the left-hand column against the legislation of choice.

(2:34)
16) Then click "Mark Selected Documents as Not Required" and the item is removed from the register.

(2:41)
17) When you are labelling documents as being not required and discounting them from the register, the system always prompts the user to put in a not required justification.

(2:53)
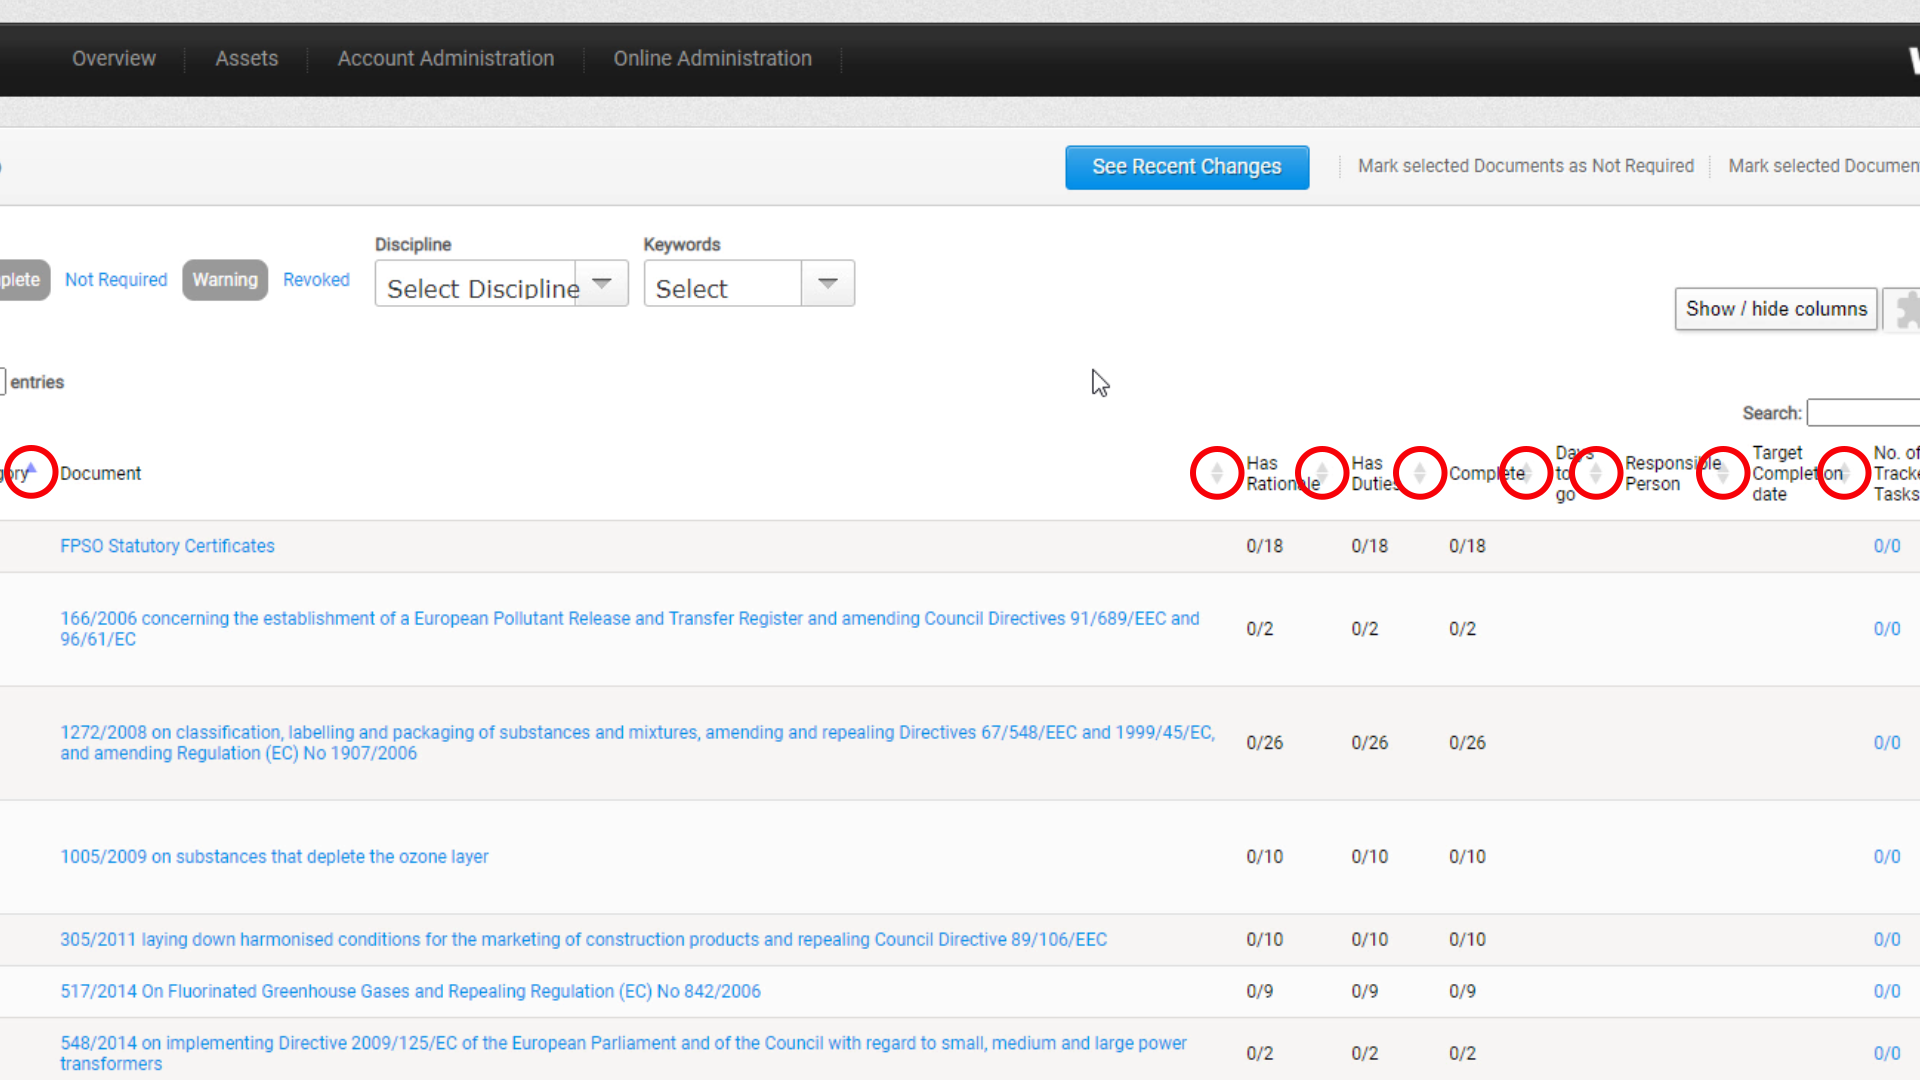
18) The grey triangles to the right of the column headers can be used to sort the information displayed. This allows the user to decide what is displayed first in the Overview screen.
(3:05)
19) For example, if you wanted to sort the list so that legislations that have all of their rationale entered into the database appear at the top, you can do so by clicking the grey arrow next to the column "Has Rationale".

(3:25)
20) When a specific sorting option is chosen and an arrow is clicked that arrow is now highlighted in a purple colour.

(3:37)
21) The search function allows you to search by date or keyword.
(3:43)
22) For example, search for "2001" will bring up all legislation with that date.

(3:50)
23) The keyword "Radiation" will list all radiation-related legislation.

In this lesson, you are going to learn how to navigate around the information of a specific regulation.
Key Takeaways:
- What are the 8 different types of functions available for regulations
- How to use the Admin function within a regulation
- How to use the Clauses Compliance function and the Legislation, ACOP, Rationale, Duties, Evidence and Justification options found within the Clauses Compliance
- What differentiates the global compliance function and how to use it
- How to use the Documents, Links, Linked Tracker Items, Authority Contacts and History Functions
- How to use the see full legislation option
If you have any questions, regarding this training program, you can always contact us using our contact form or by emailing us to info@westoncompliance.com
(0:15)
1) For the purpose of this session, we are going to use the SI 1992/2966 The Personal Protective Equipment At Work Regulations as an example.

(0:22)
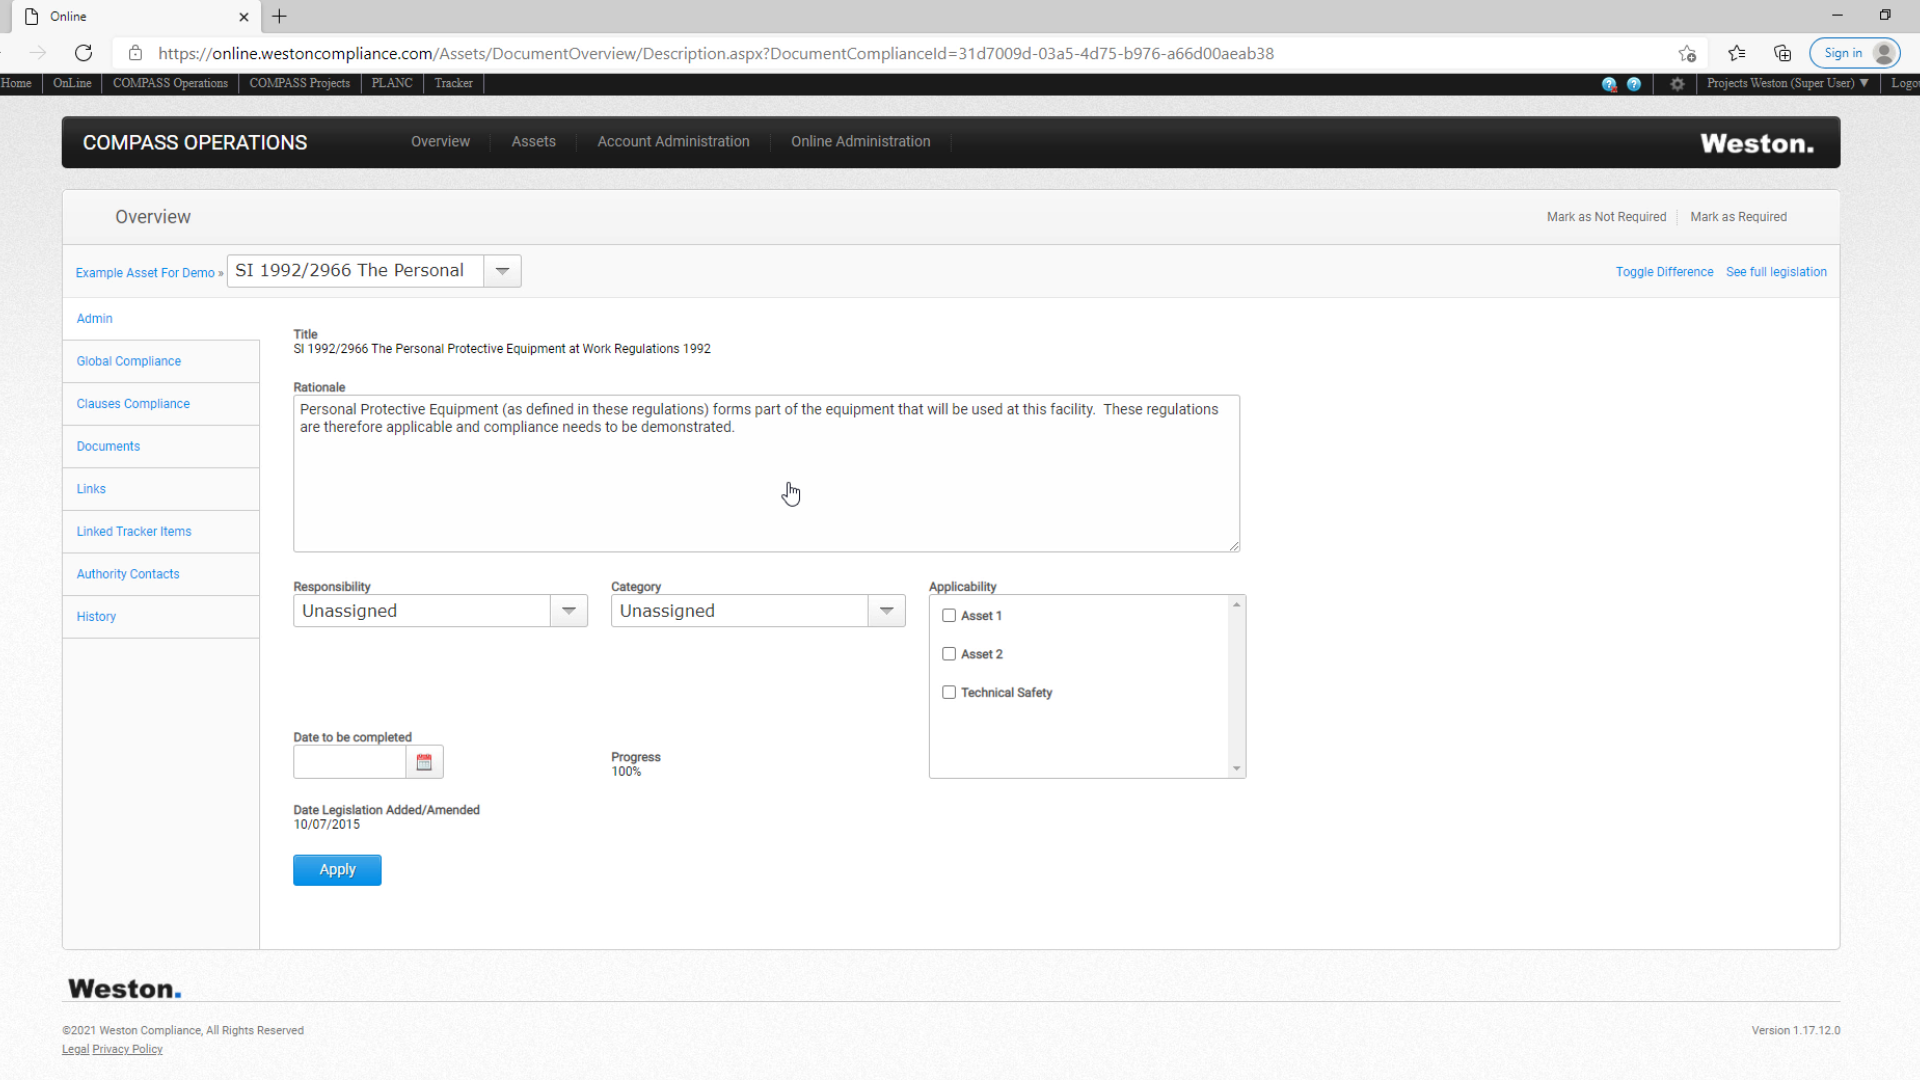
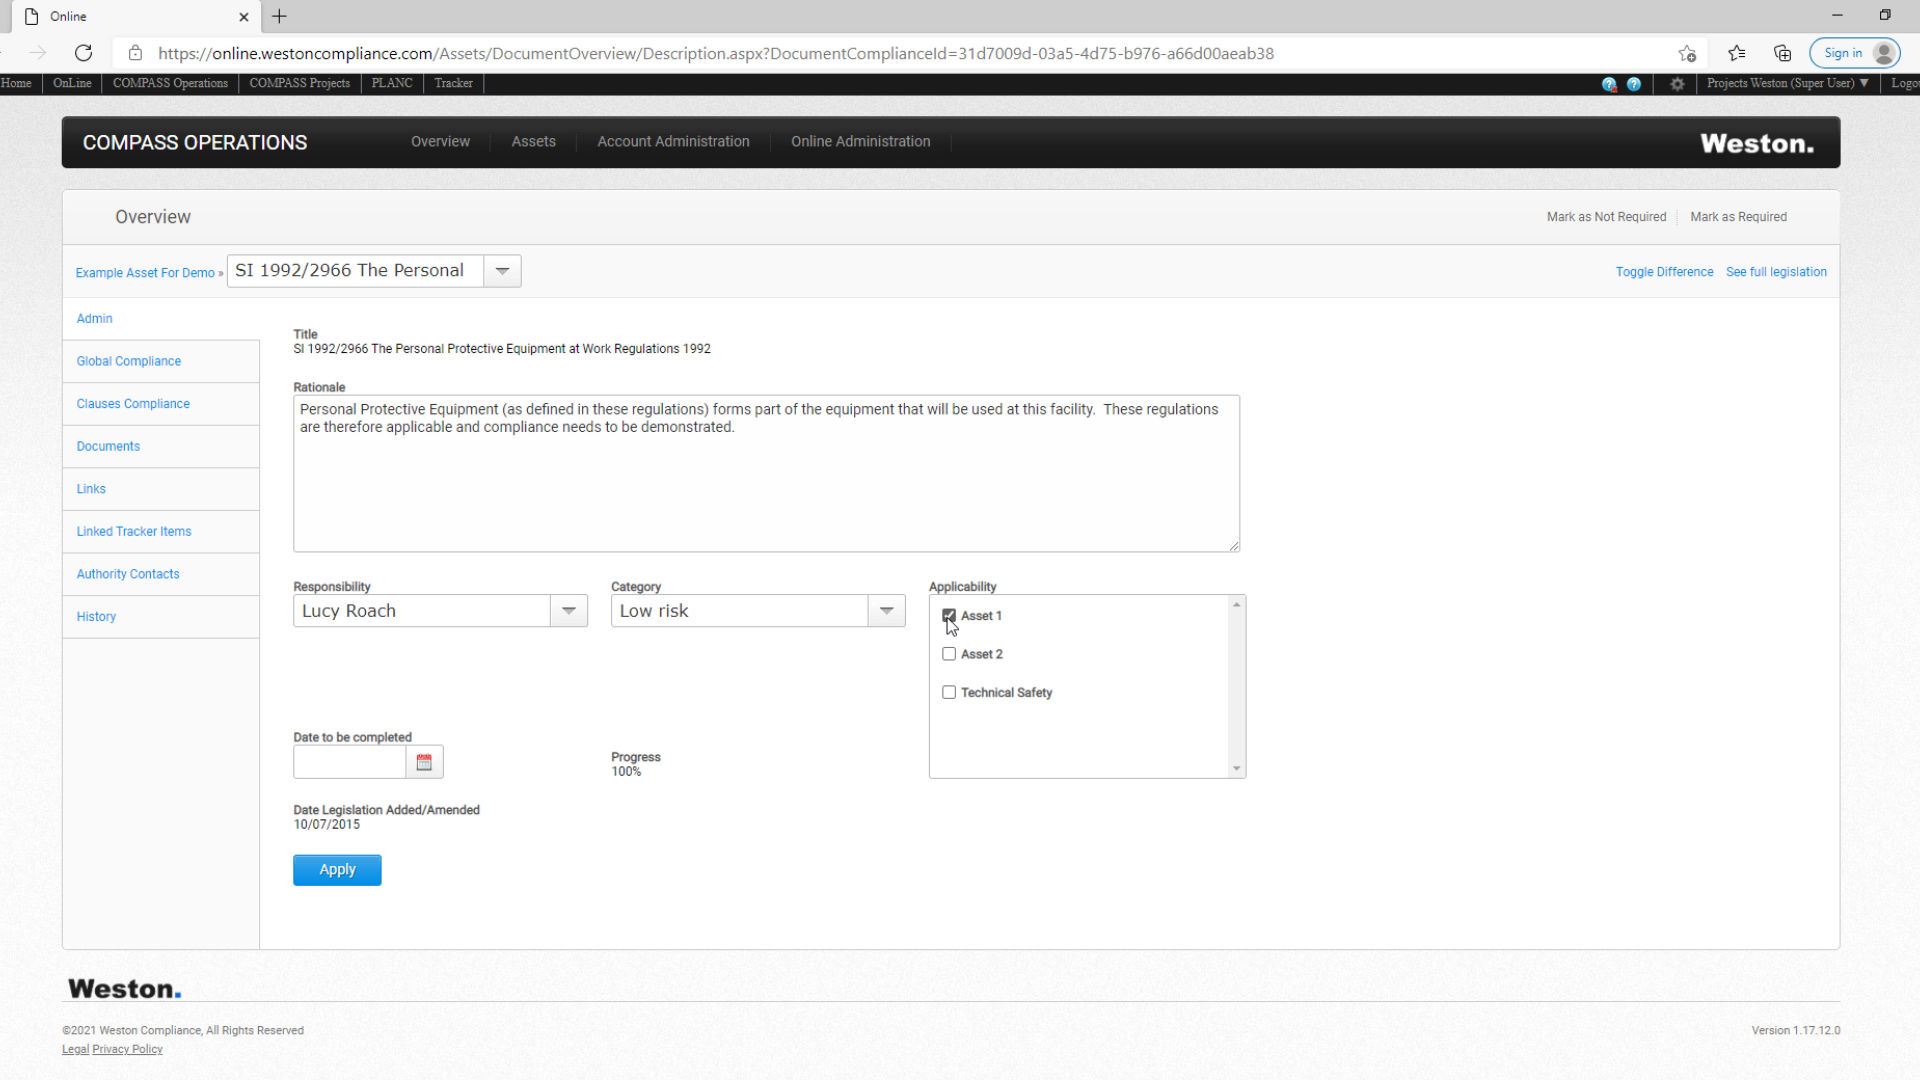
2) Clicking on a regulation title automatcally opens the Admin page within that regulation.
(0:28)
3) In the admin page we can see the rationale as to why that particular regulation applies.

(0:34)
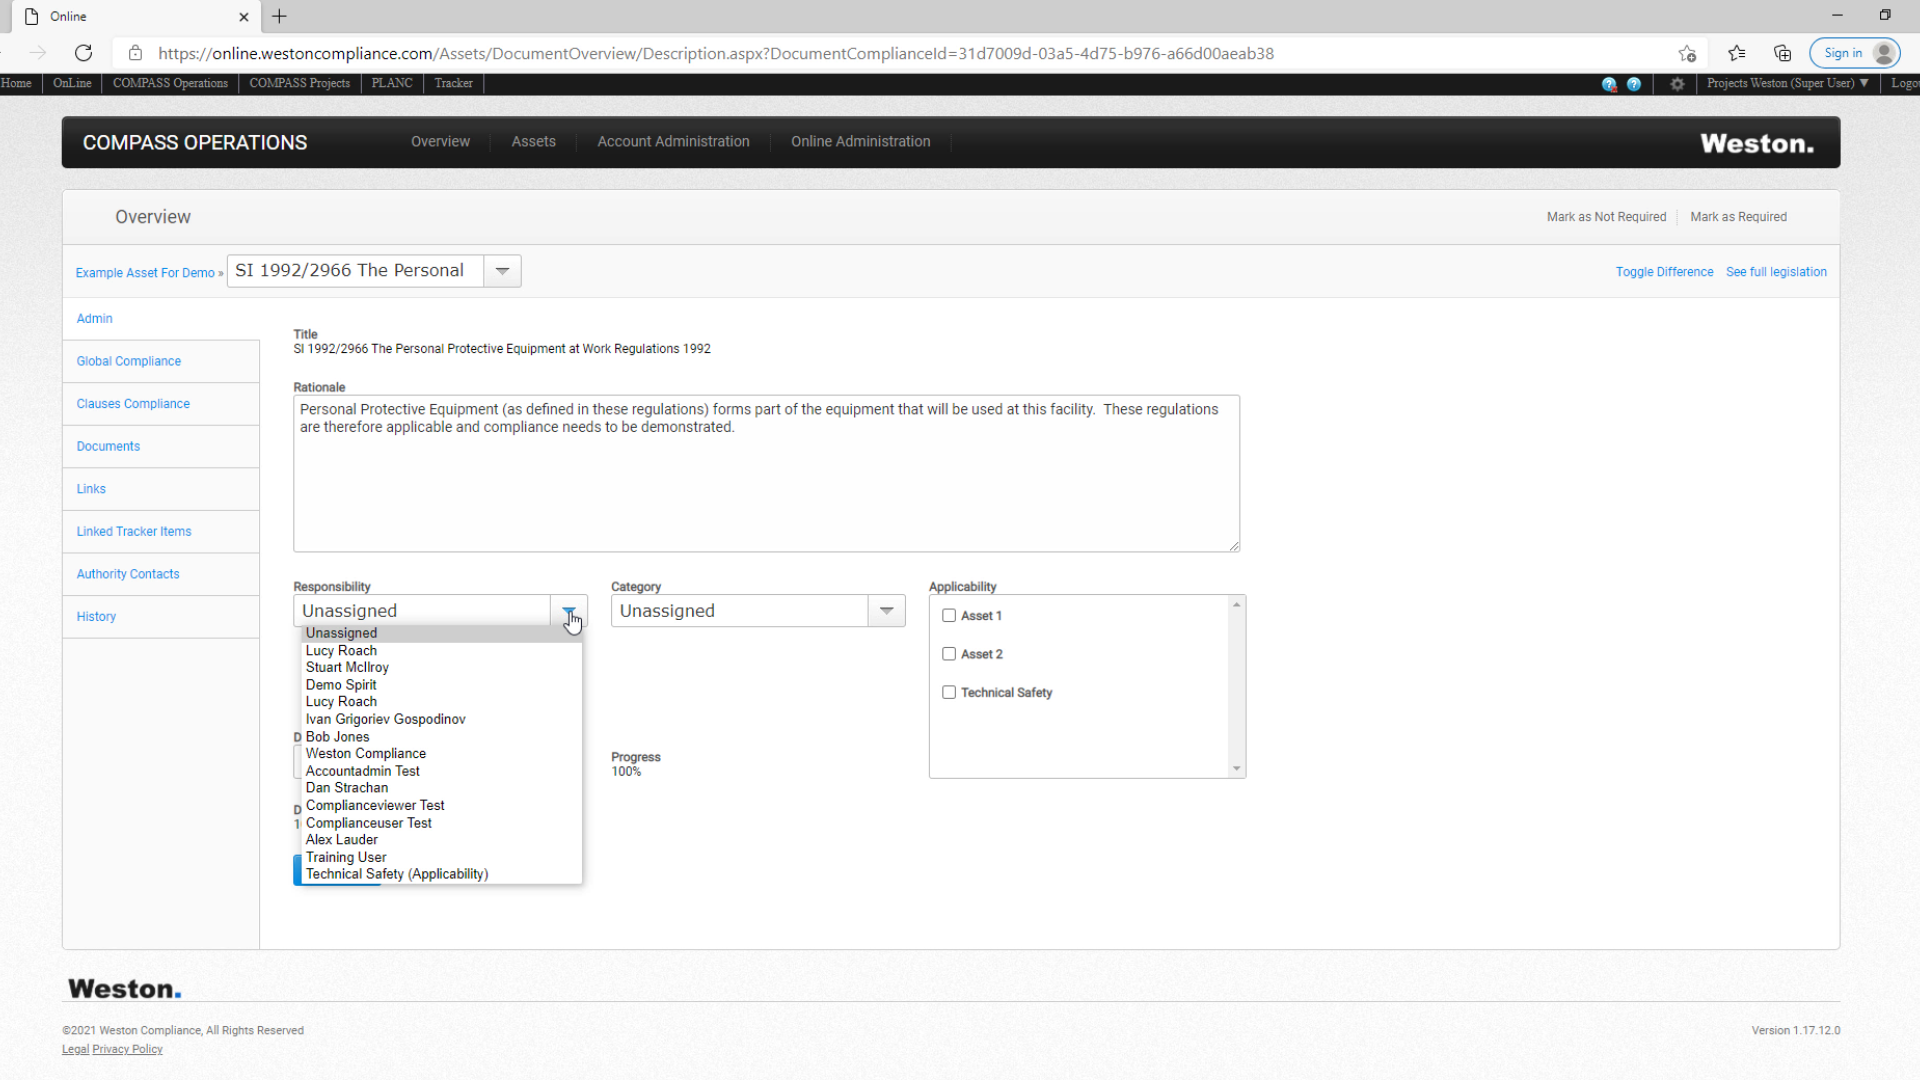
4) On this screen you can assign a responsible person under "Responsibility";
(0:39)
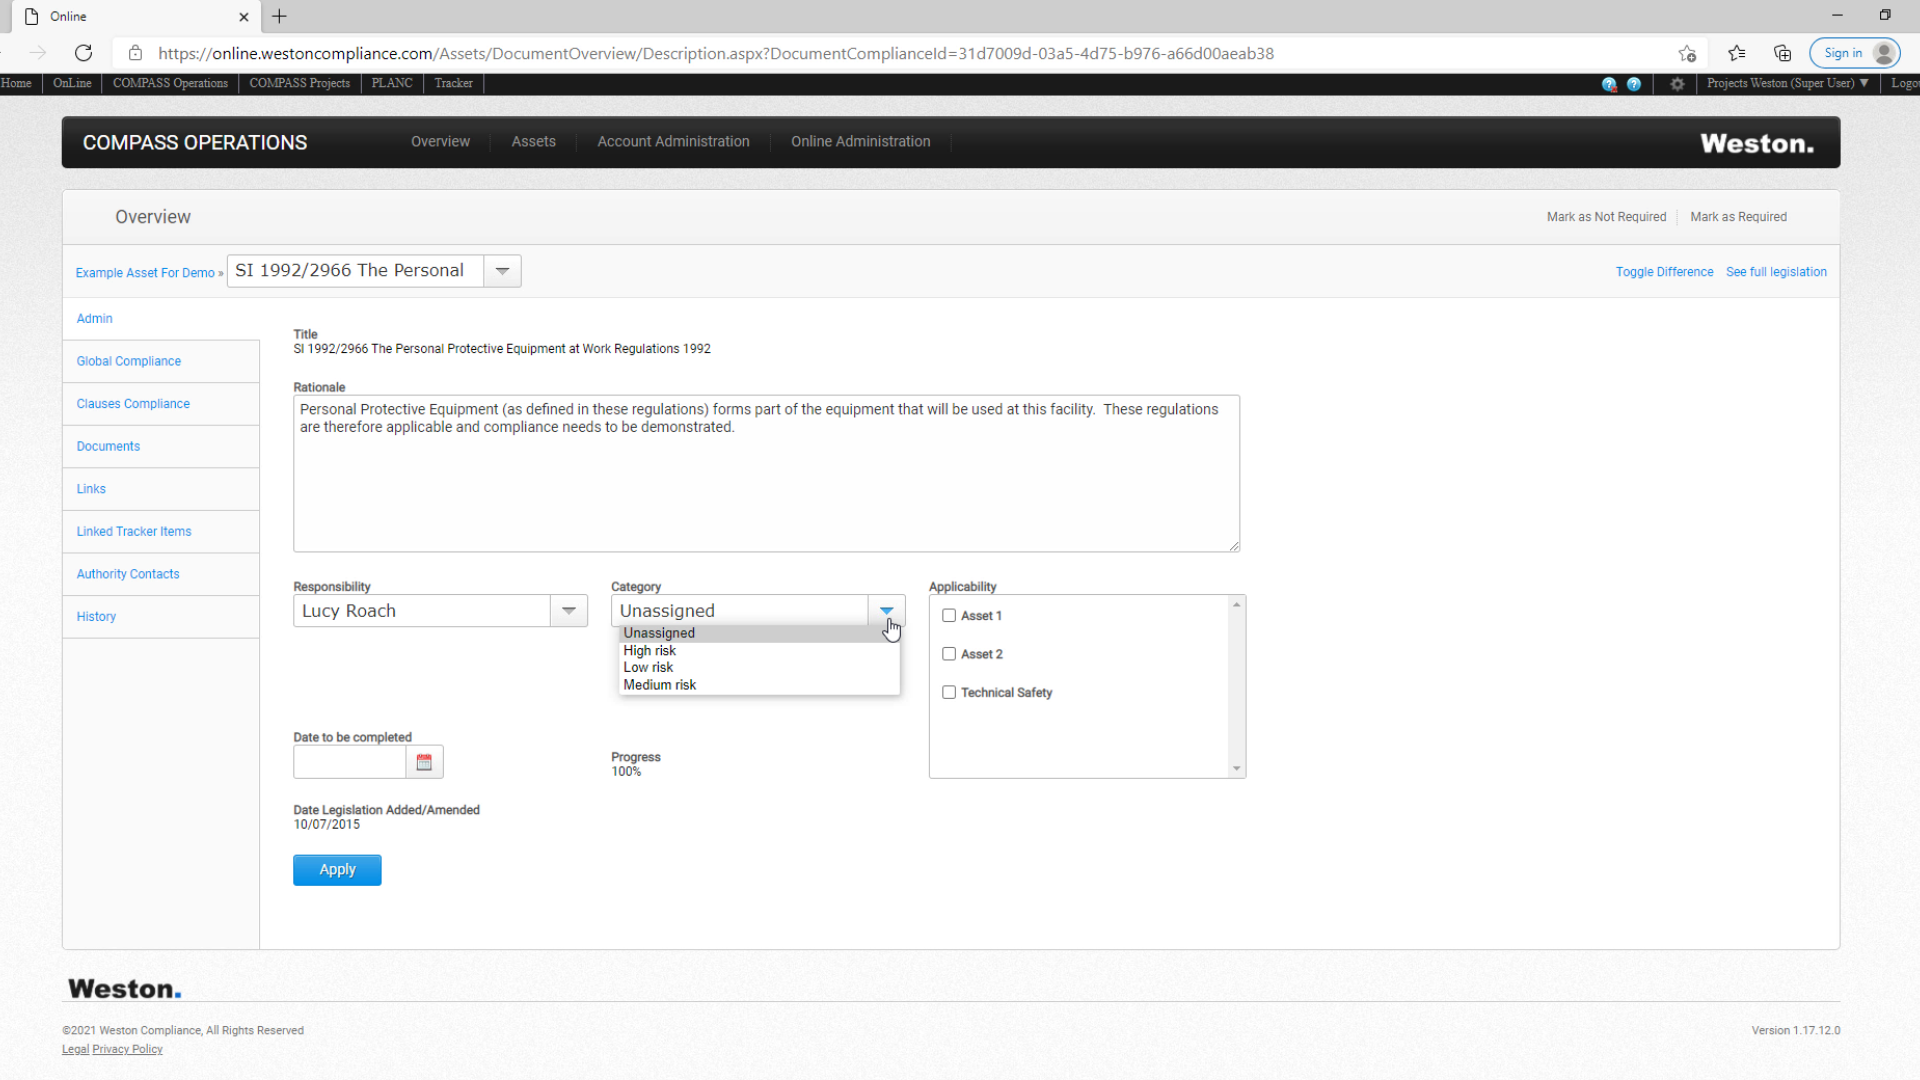
5) Categorise the regulation under "Category", in this example giving the item a specifc level of risk;
(0:45)
6) Text regarding Applicability;
(0:48)
7) And set a desired completon date. All of these options are customisable for users. If a user wishes to create custom functions for their admin page, they will need to contact their COMPASS Operations account administrator.

(1:04)
8) You must click the Apply button to save any changes made.

(1:16)
9) Within each regulation there are 8 different functions available. They are accessed by the tabs on the left-hand side of screen.

(1:27)
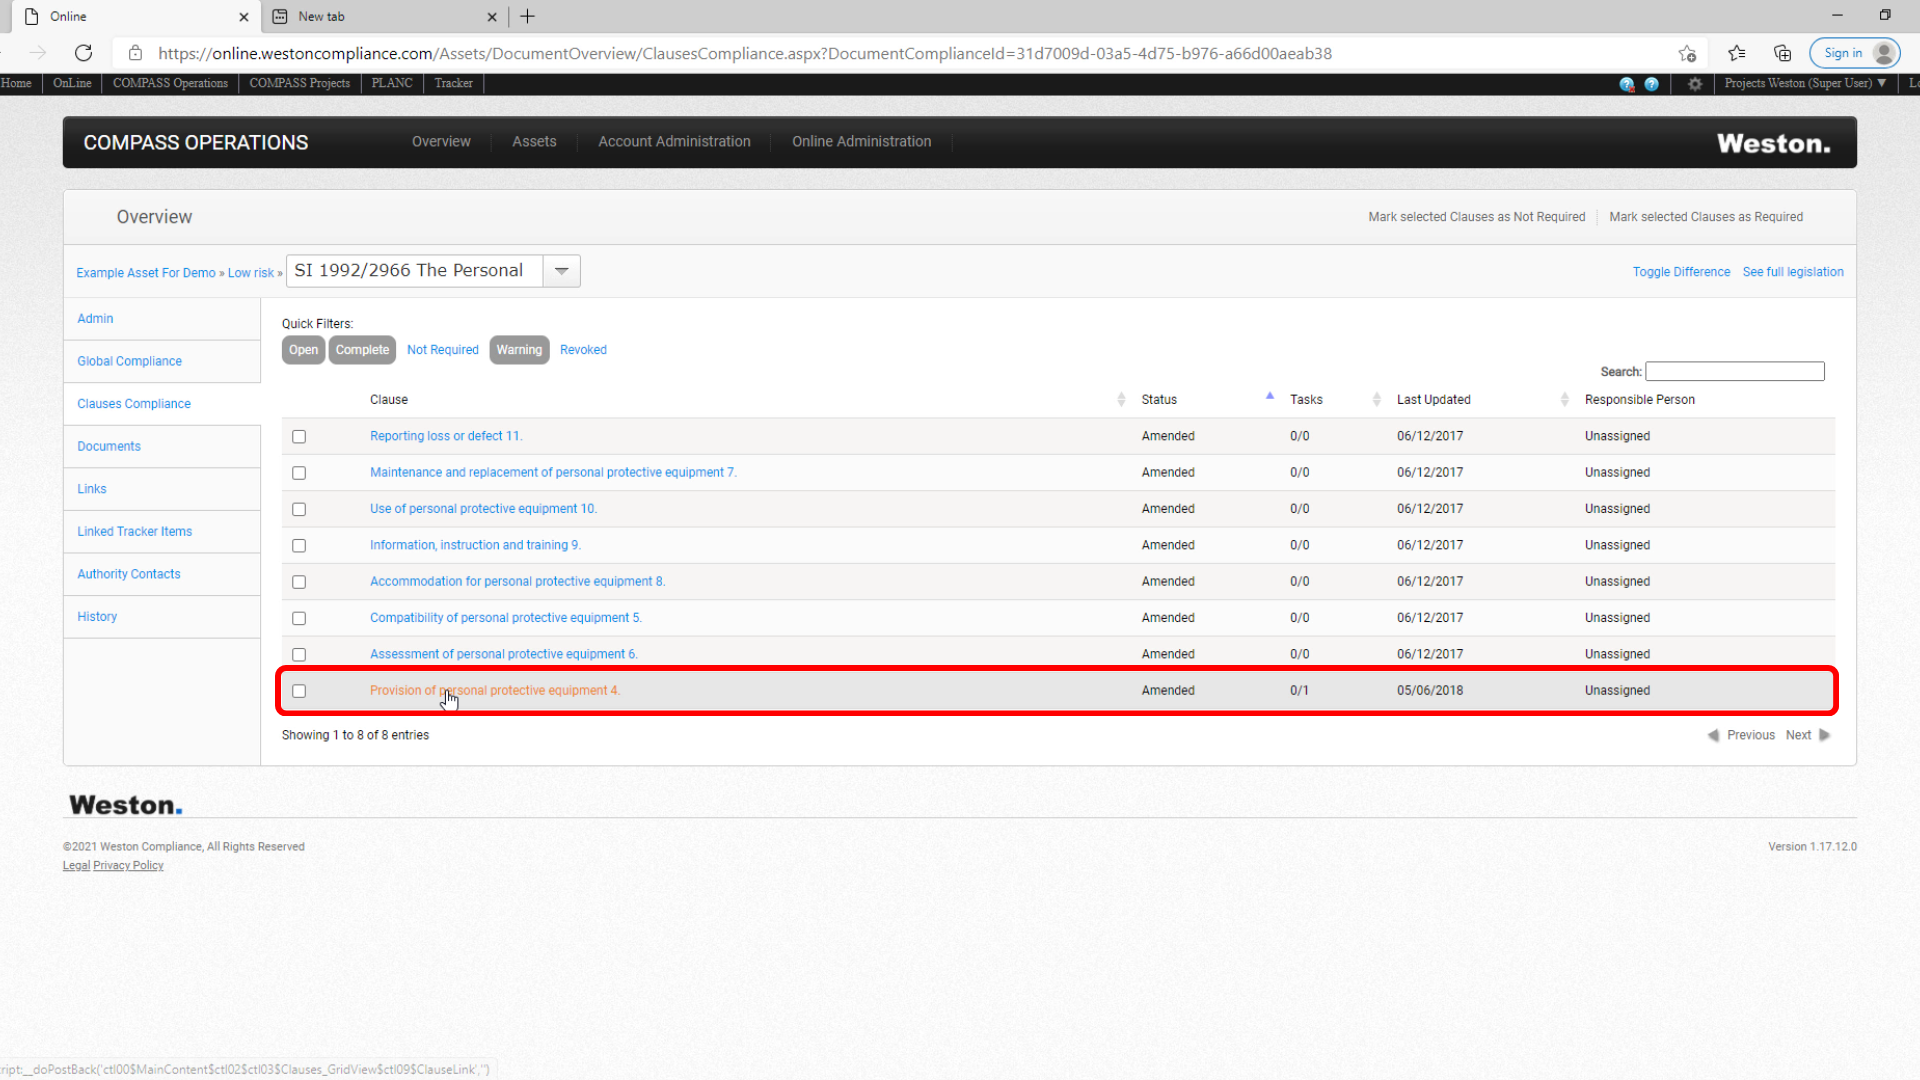
10) We'll go first into the Clauses Compliance function, as this is the one most frequently used.

(1:33)
11) This function allows you to view the full list of legislative Clauses contained within that Regulation.

(1:40)
12) Clicking on a Clause takes you into that particular Clause.
(1:44)
13) Within each clause you can find the following information:

(1:47)
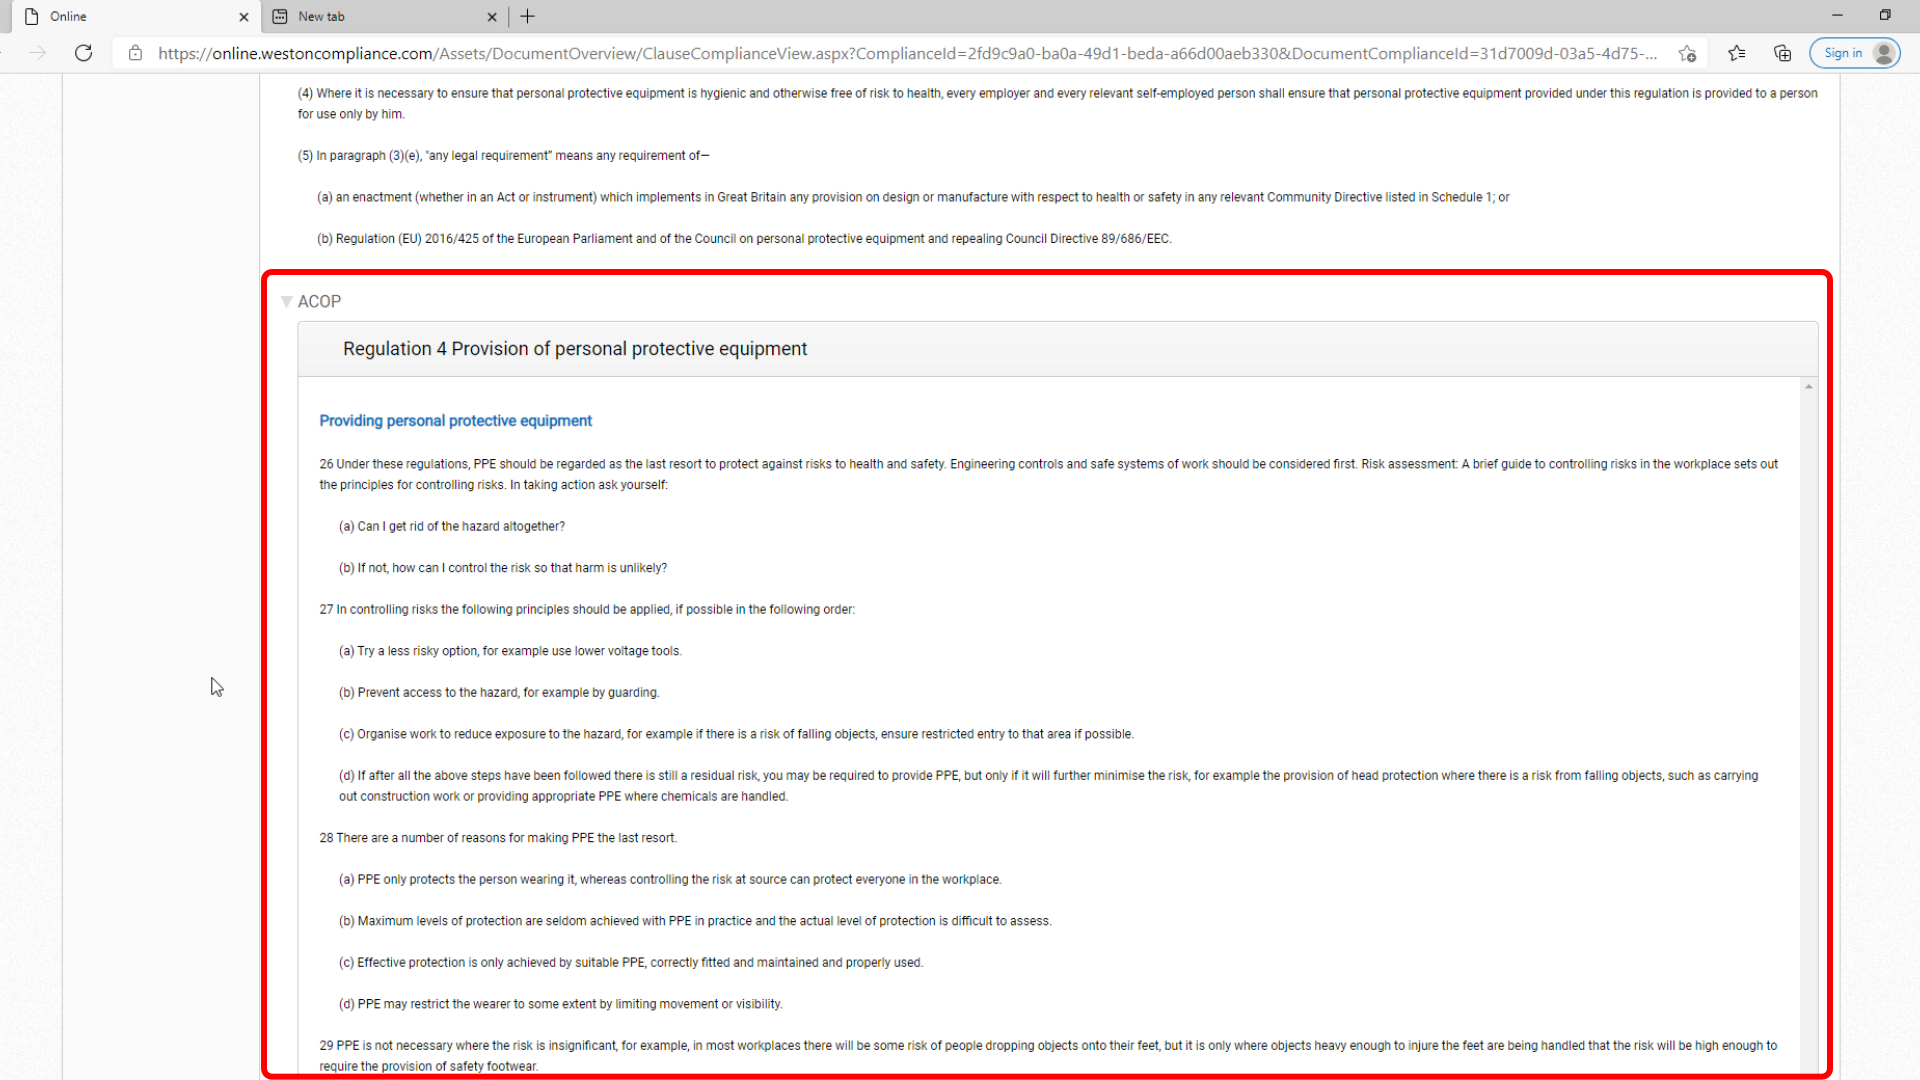
14) Legislation shows us the full text from this legislative Clause, which in this case is Clause 4 Proision of personal protective equipment.

(1:57)
15) For Non-UK legislation, the user has the option to view the clause in their native language under the standard Legislation tab. In our example, the legislation is displayed in Danish.

(2:10)
16) The user can also use the "Translated Legislation" tab where the clause can be viewed in English.

(2:19)
17) If there is an Approved Code of Practice (ACOP), associated with the regulation, you will see an extract relating to this particular Clause under the ACOP tab.
(2:30)
18) Rationale has a high-level statement as to why that particular regulation applies.

(2:35)
19) Duties - a particular statement on what must be done by the employer or duty holder to ensure cmpliance.

(2:42)
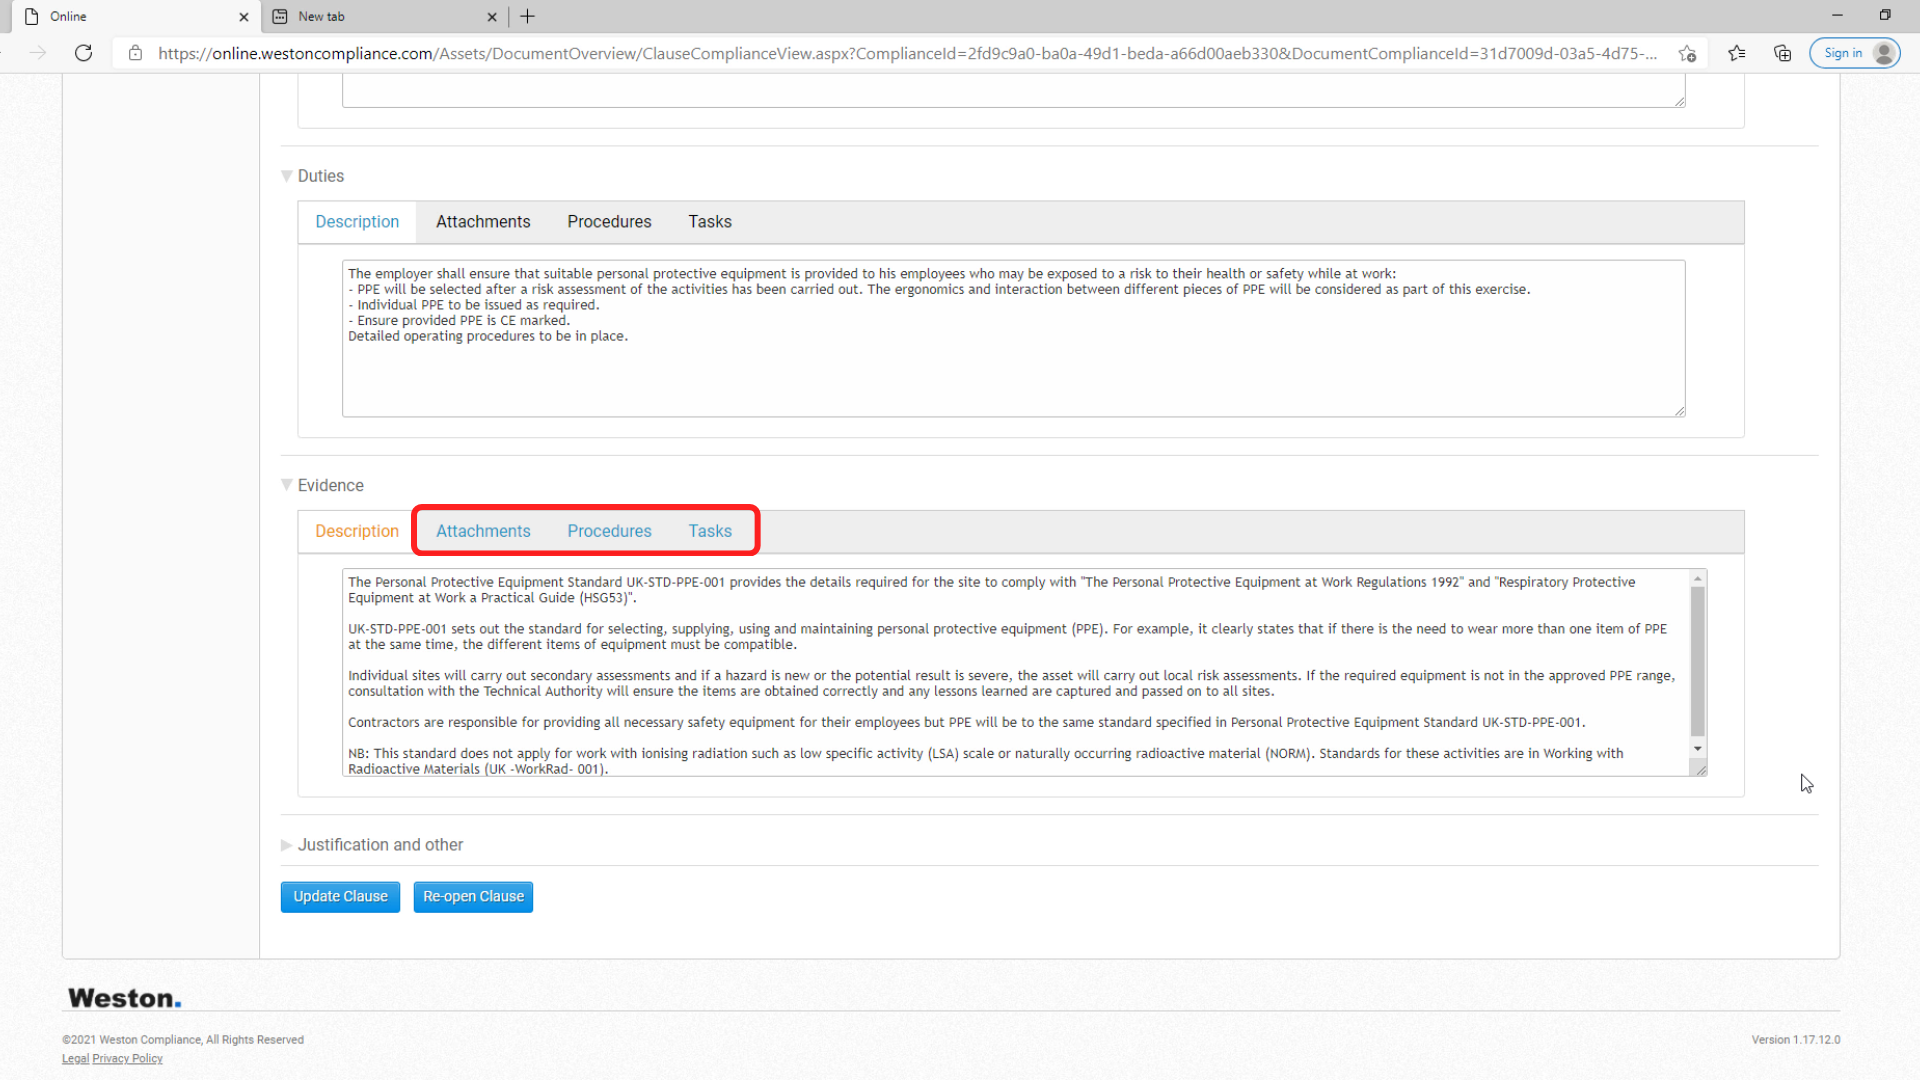
20) Evidence - evidence on how your organisation complies with this legislative clause. Typically, this will include reference to a document procedure or procedures from your organisation's management system. In our example, there is reference made to this particular protective equipment standard.

(3:03)
21) There are 3 additional tabs within the Evidence function that can be used. These are Attachments, Procedures, and Tasks.
(3:14)
22) Under Attachments, the user can add references such as guidance or standards.

(3:20)
23) Under the Procedures tab, applicable procedures can be listed. In our example, we have two procedures that have been tagged.

(3:36)
24) Lastly, we have the Tasks tab. This is where any associated tasks can be logged using the Tracker tool.

(3:51)
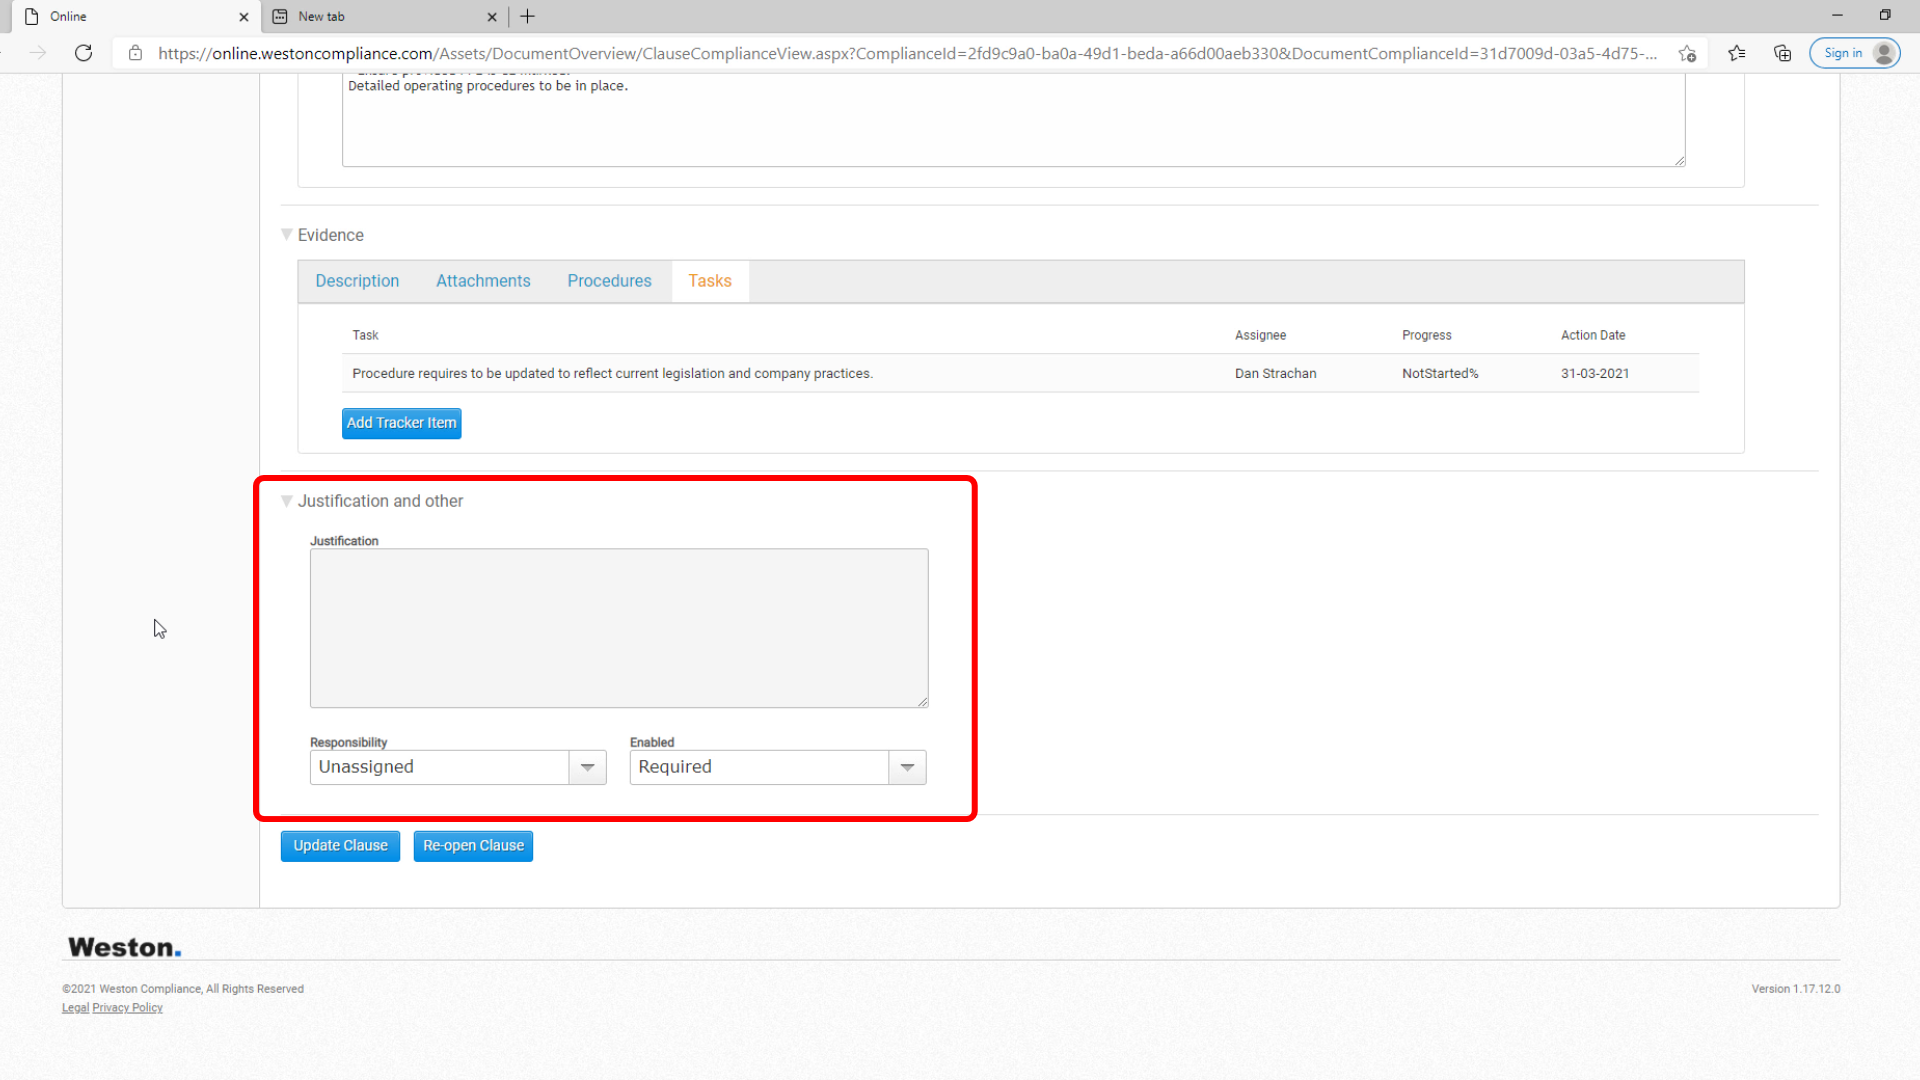
25) At the very bottom of the Clauses Compliance screen, the "Justification and other" function allows you to mark a Clause as Not Required in cases where it is considered to be irrelevant to your organisation's asset or acitivites.
(4:04)
26) Select Not Required from the drop down menu here and then insert the justification as to why this is the case.

(4:11)
27) The Update Clause button at the bottom of the screen allows you to save all of the changes made to the clause into the system.

(4:19)
28) The Re-open functions allows a Clause that has been previously marked as Complete to be re-opened.

(4:28)
29) We will now take a look at the remaining functions available within a regulation, starting with Global Compliance.

(4:37)
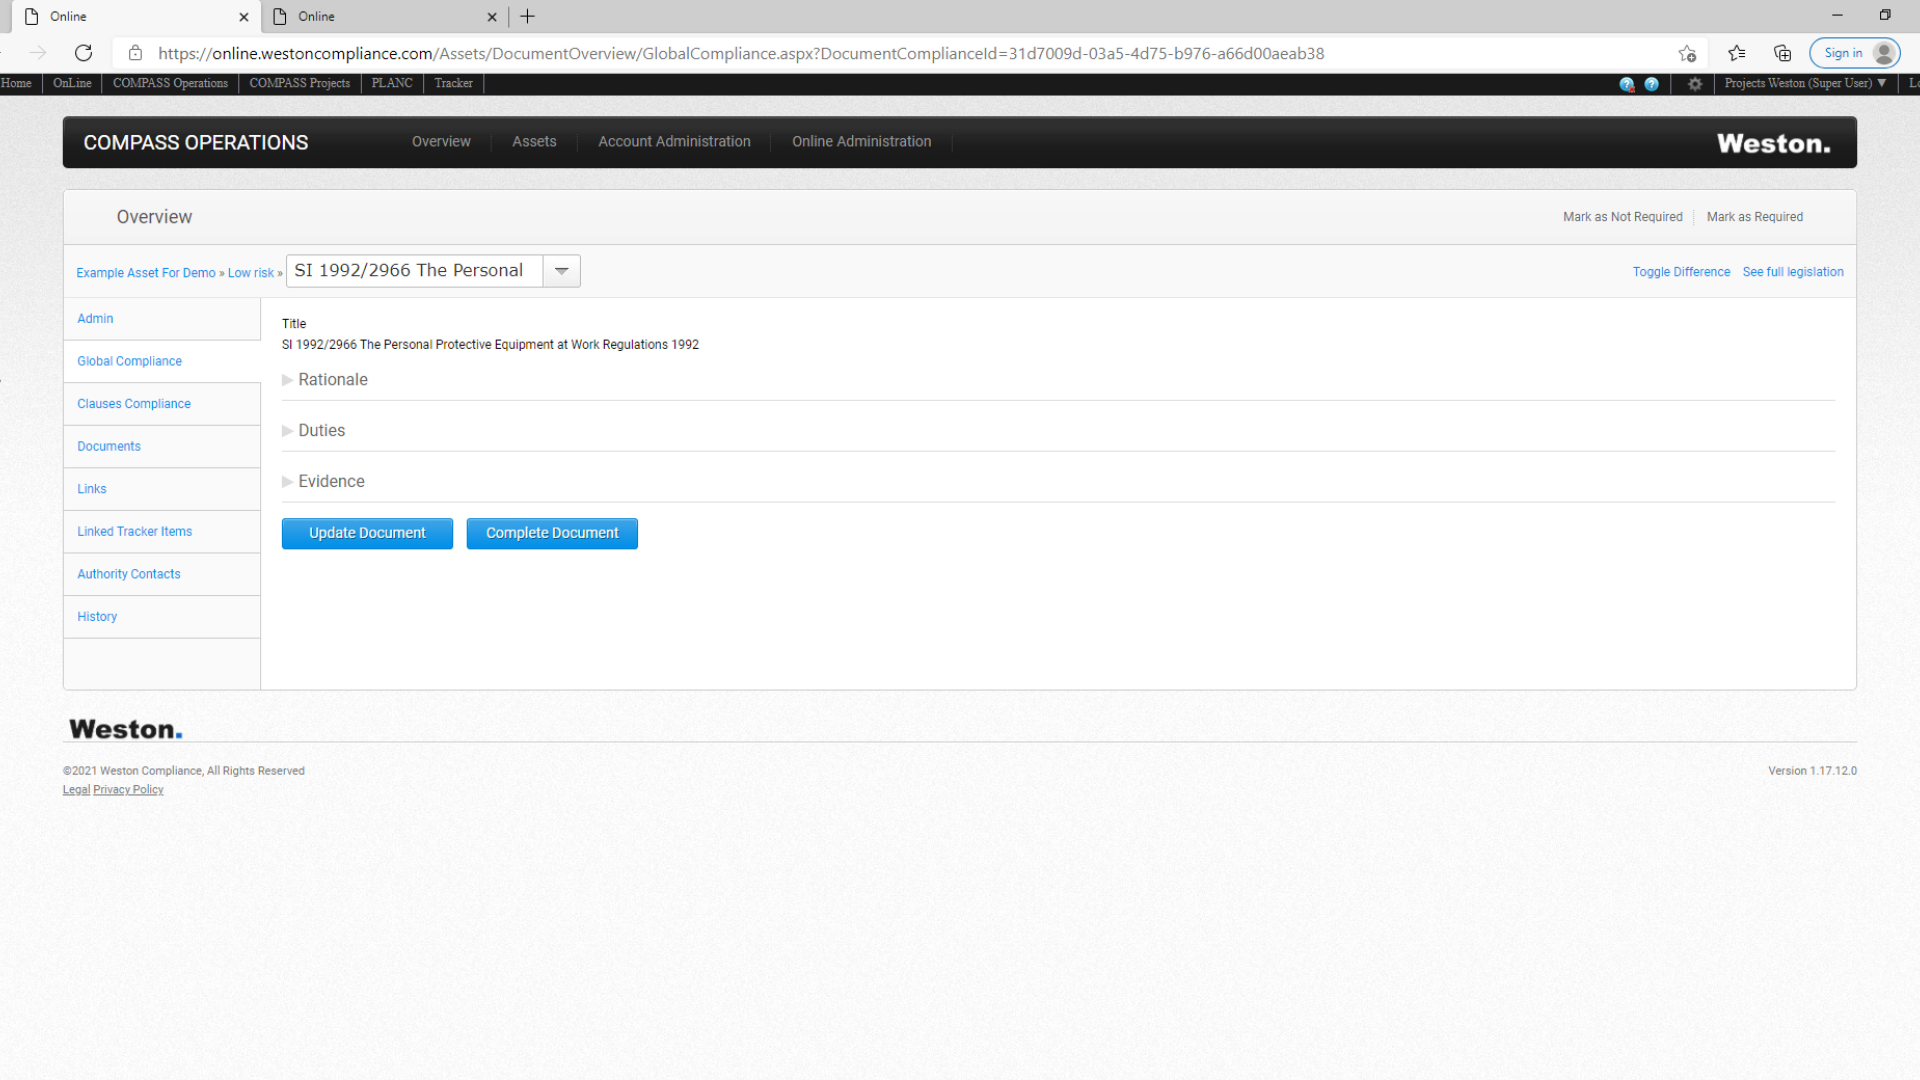
30) The Global Compliance Function allows you to set Duties and Evidence at a global level, that is for the entire regulation, rather than clause by clause.
(4:48)
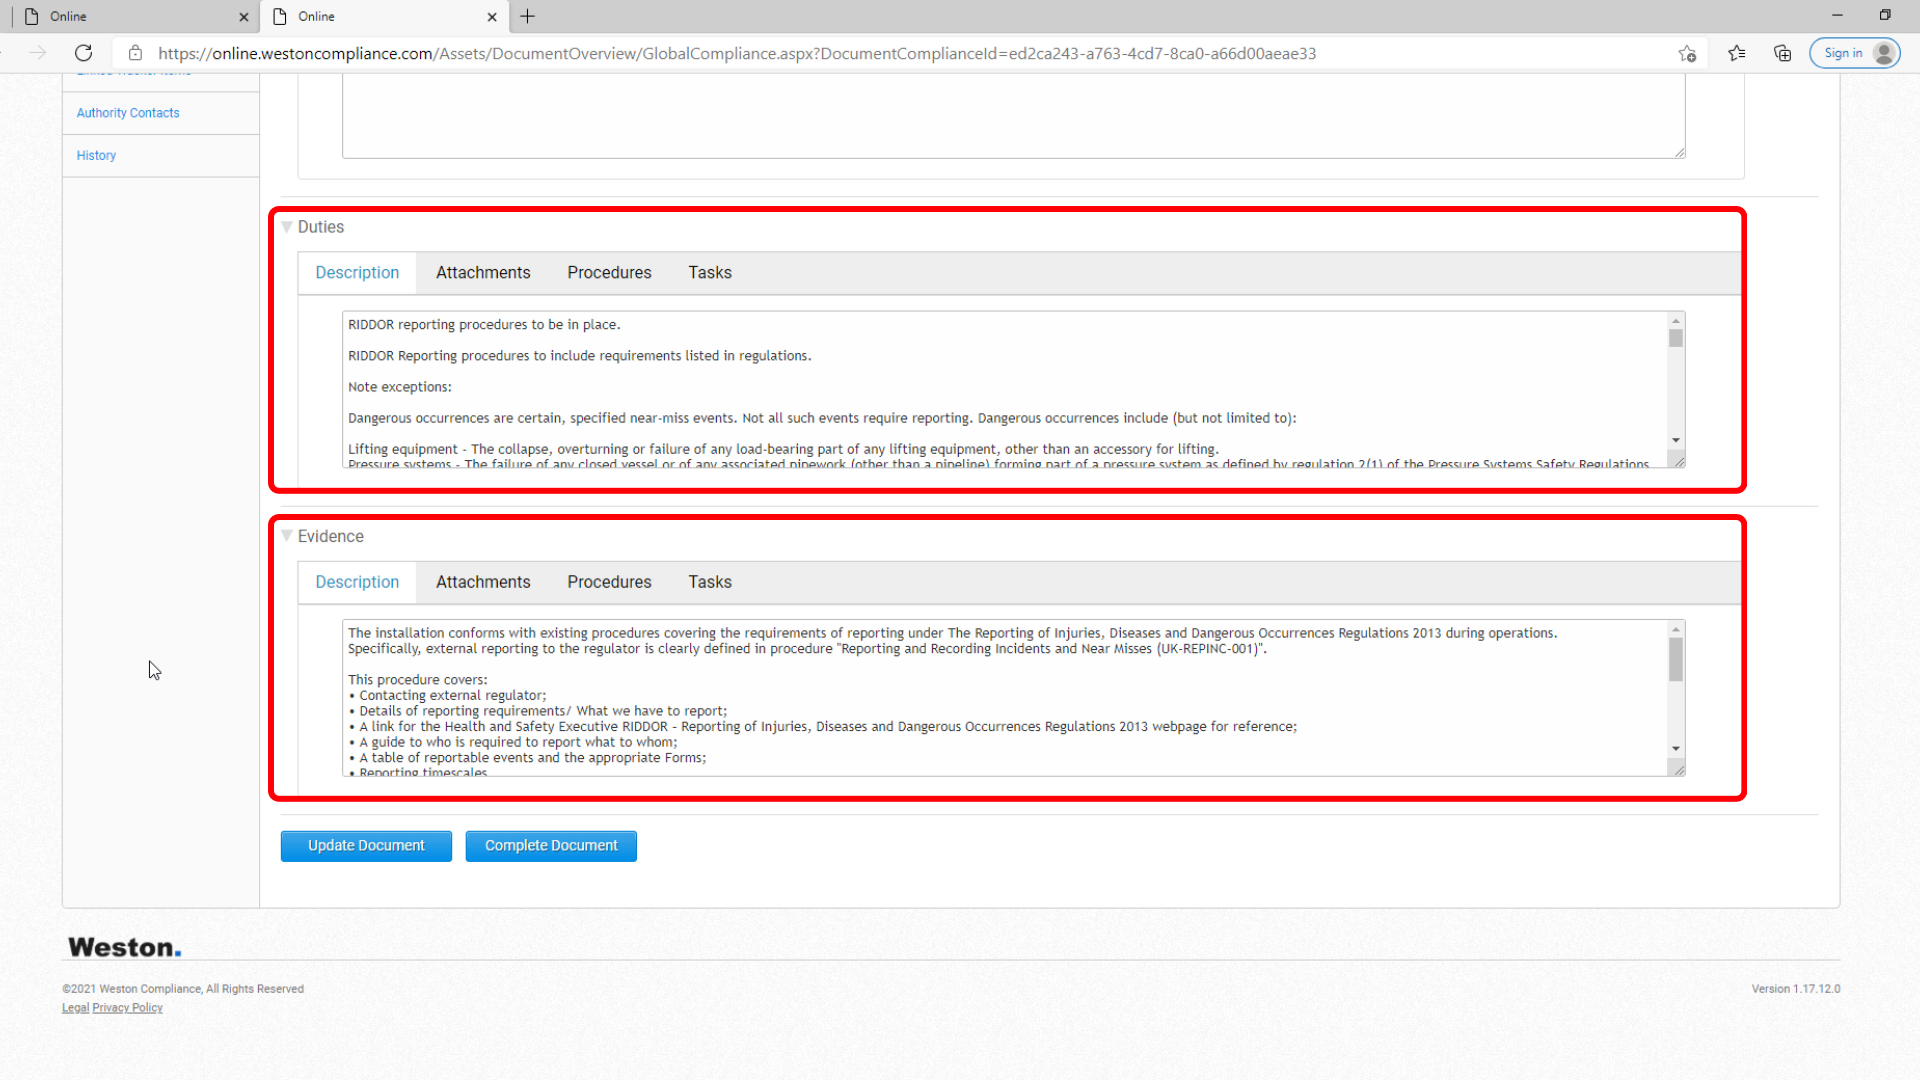
31) Typically, Global Compliance is used to address less-complex legislation which can be evidenced by a single procedure or process, such as this example SI 2013/1471 The Reporting of Injuries, Deseases and Dangerous Occurrences Regulations which has been addressed by a single procedure.

(5:08)
32) In this example, the duties and evidence have been set at a global level.
(5:16)
33) Next, we have the Documents function.

(5:19)
34) It allows you to see any documents or procedures which have been attached as Evidence of compliance across all the clauses in the regulation.

(5:28)
35) The Links function provides an option to link to an external source.

(5:32)
36) For example, to guidance on a regulator's web page or to a specific URL location in the Weston OnLine database. Often, this is used to link to additional useful detail cited in regulatory Annexes or Schedules. In our example, we have attached a URL to the HSE RIDDOR guidance.

(5:54)
37) Next is the Linked Tracker Items.

(5:57)
38) Which allows you to view actions raised in the Tracker system against this piece of legislation.

(6:09)
39) Authority Contacts allows you to add details of your regulatory authority contacts.

(6:16)
40) Lastly, the History function provides a user with a log changes made.

(6:20)
41) Items are sorted by responsible person;

(6:24)
42) and date;

(6:26)
43) You may also have noticed the See Full Legislation button which is visible on all the screens within a regulation.

(6:34)
44) Clicking here opens the full legislative text in Weston OnLine in a new window.

In this lesson, you are going to learn how to manage changes to regulations.
Key Takeaways:
- How to spot when a regulation is amended
- How does the system-generated email notification work
- How to view the amended text
- How to apply changes to amended clauses
- What to do when action needs or does not need to be taken against specific amendments
- How to bring a regulation back into the system as "Completed"
If you have any questions, regarding this training program, you can always contact us using our contact form or by emailing us to info@westoncompliance.com
(0:09)
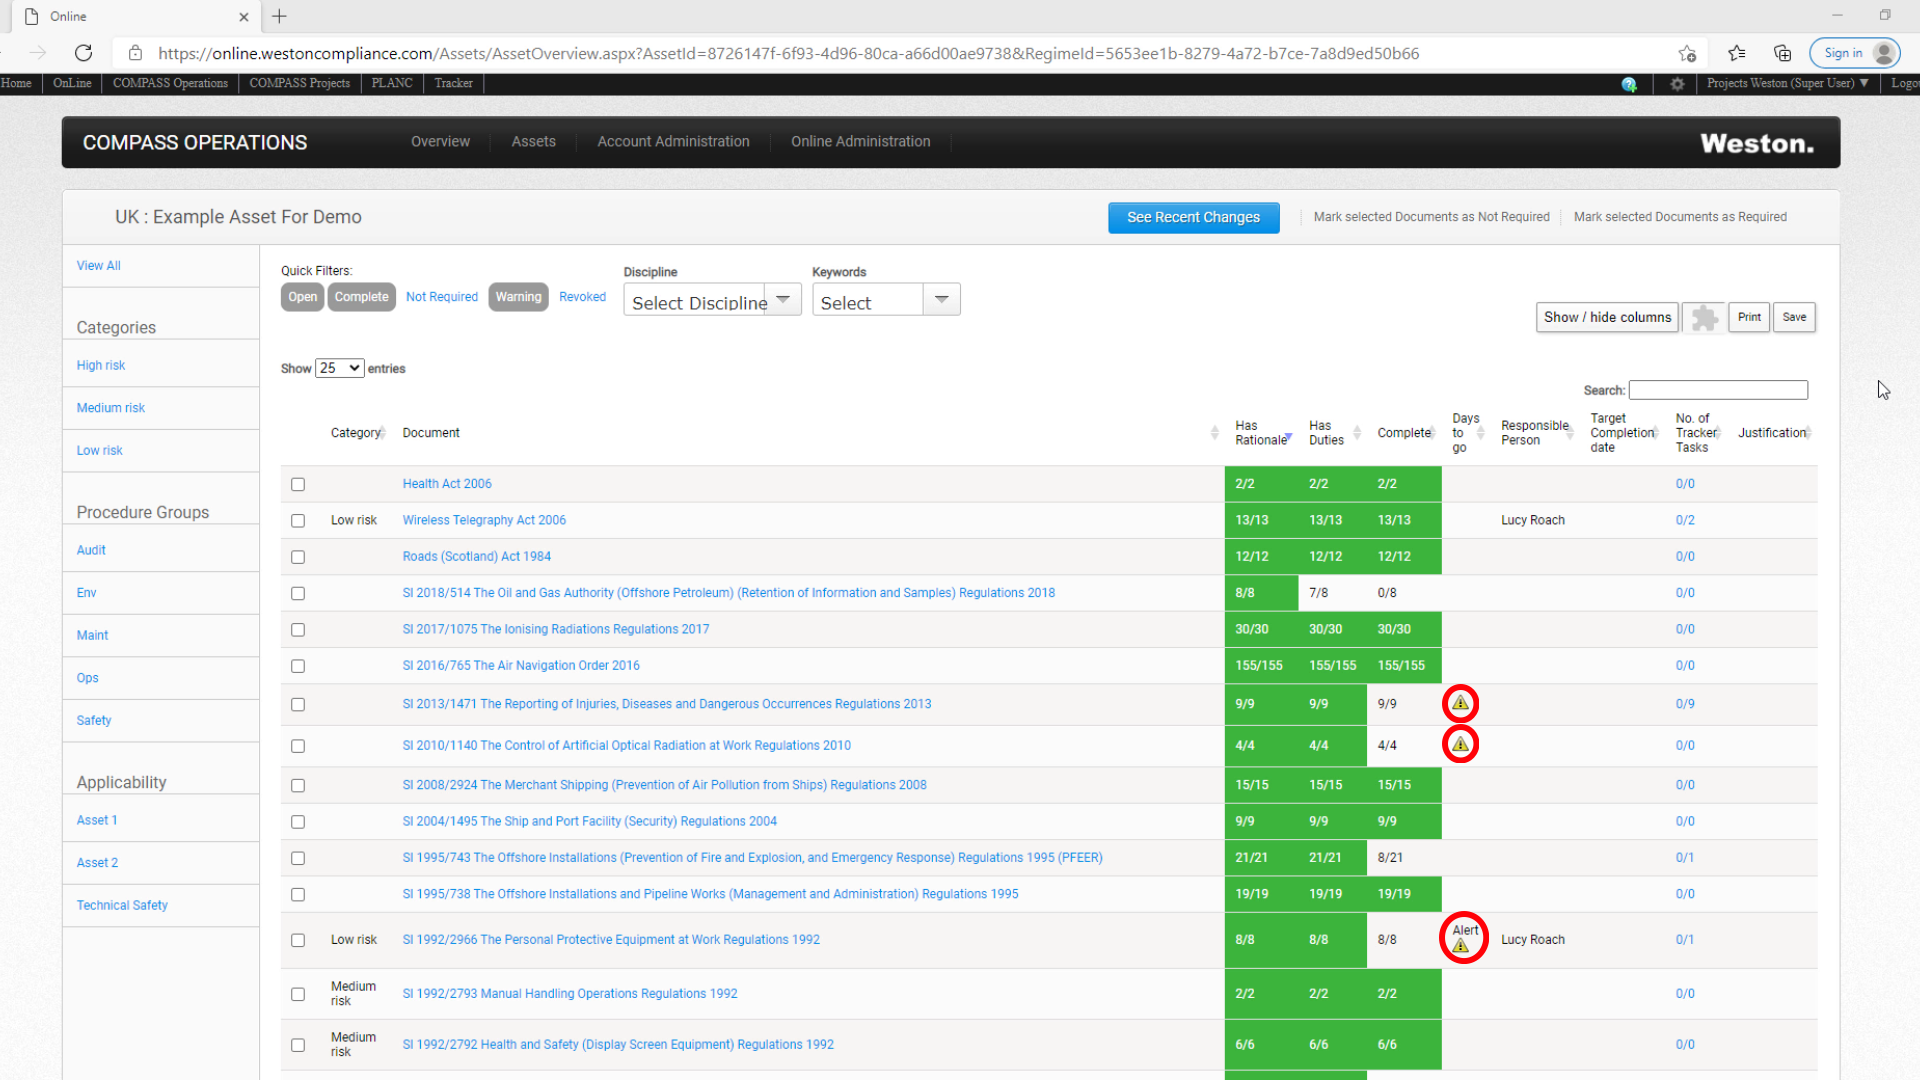
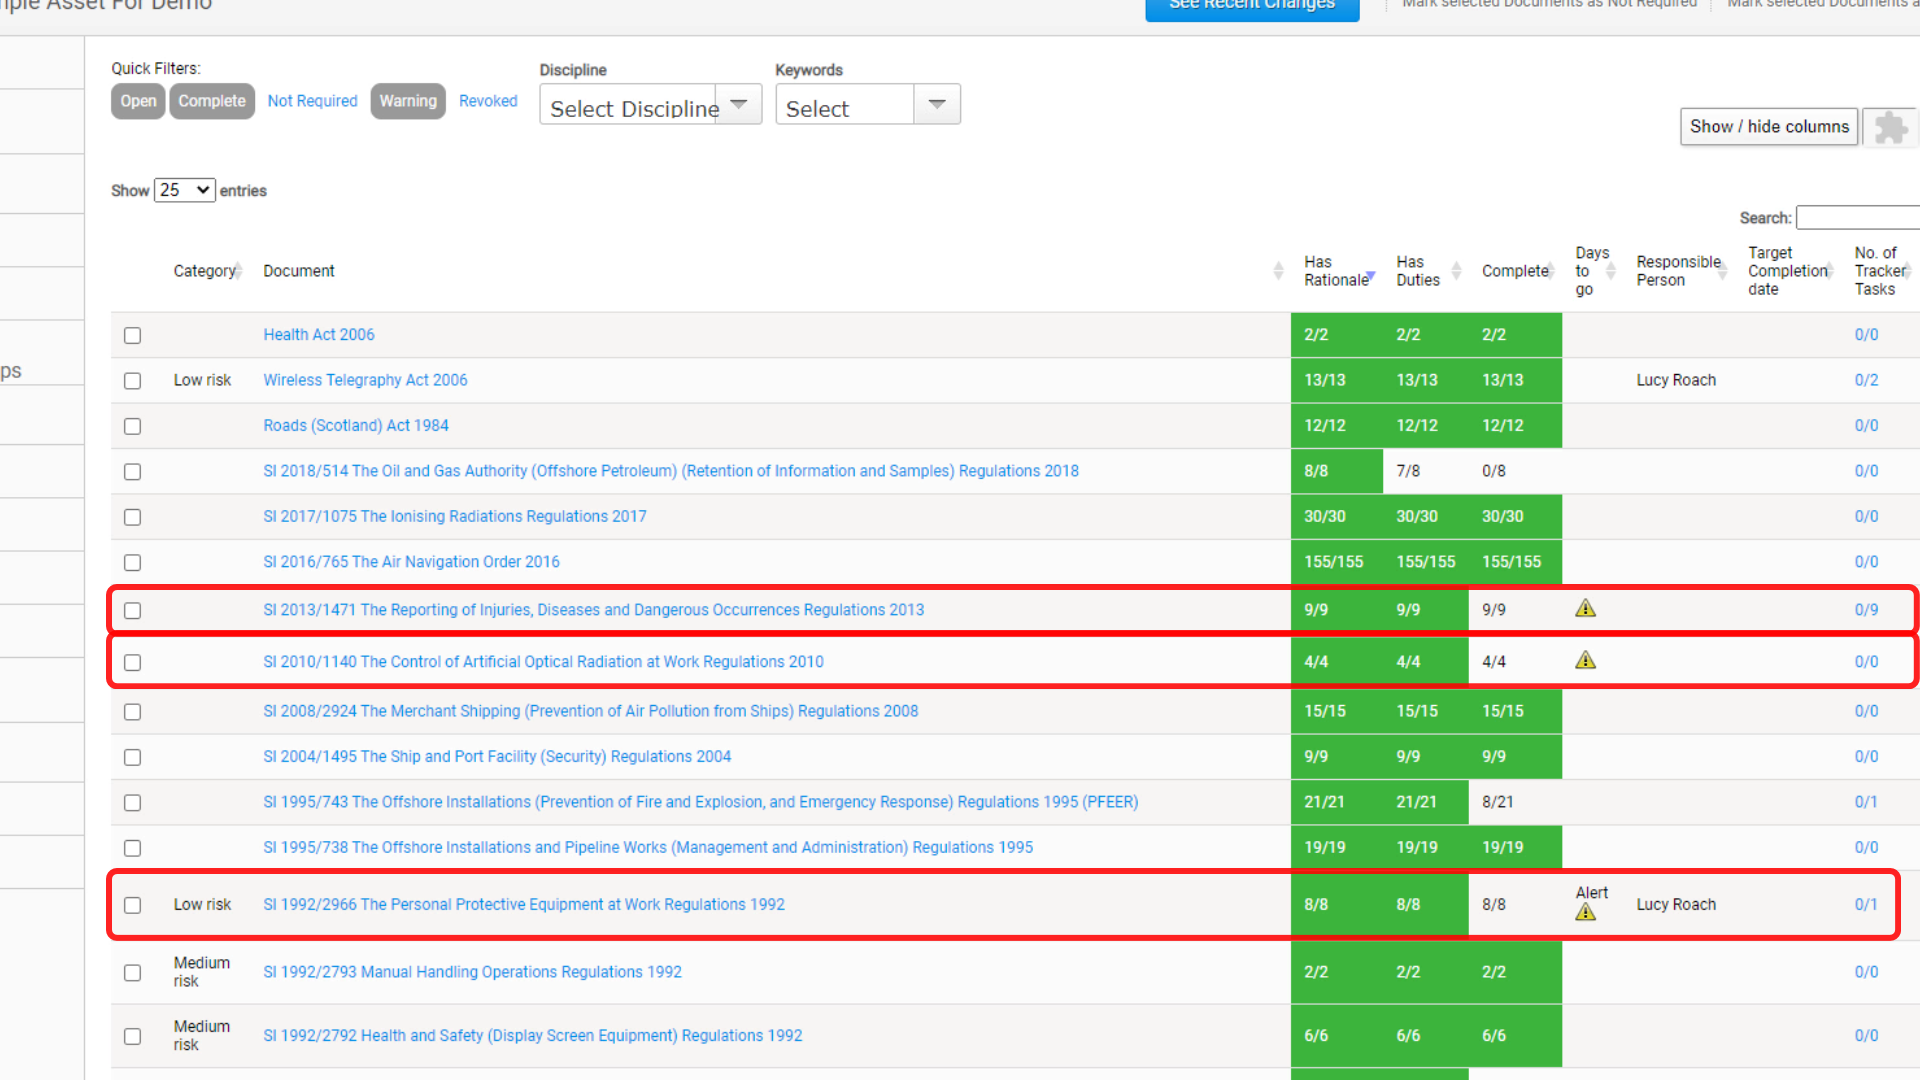
1) If a regulation is amended, a warning symbol will appear alongside that regulation.
(0:15)
2) In our example overview screen, we can see that we have three different regulations that have been amended and await further action to be taken.
(0:25)
3) If the regulatory clause impacted by the amendment was previously marked as Complete, then its compliance status will revert to Open. Consequently, the Complete column of the regulation will no longer be green.
(0:41)
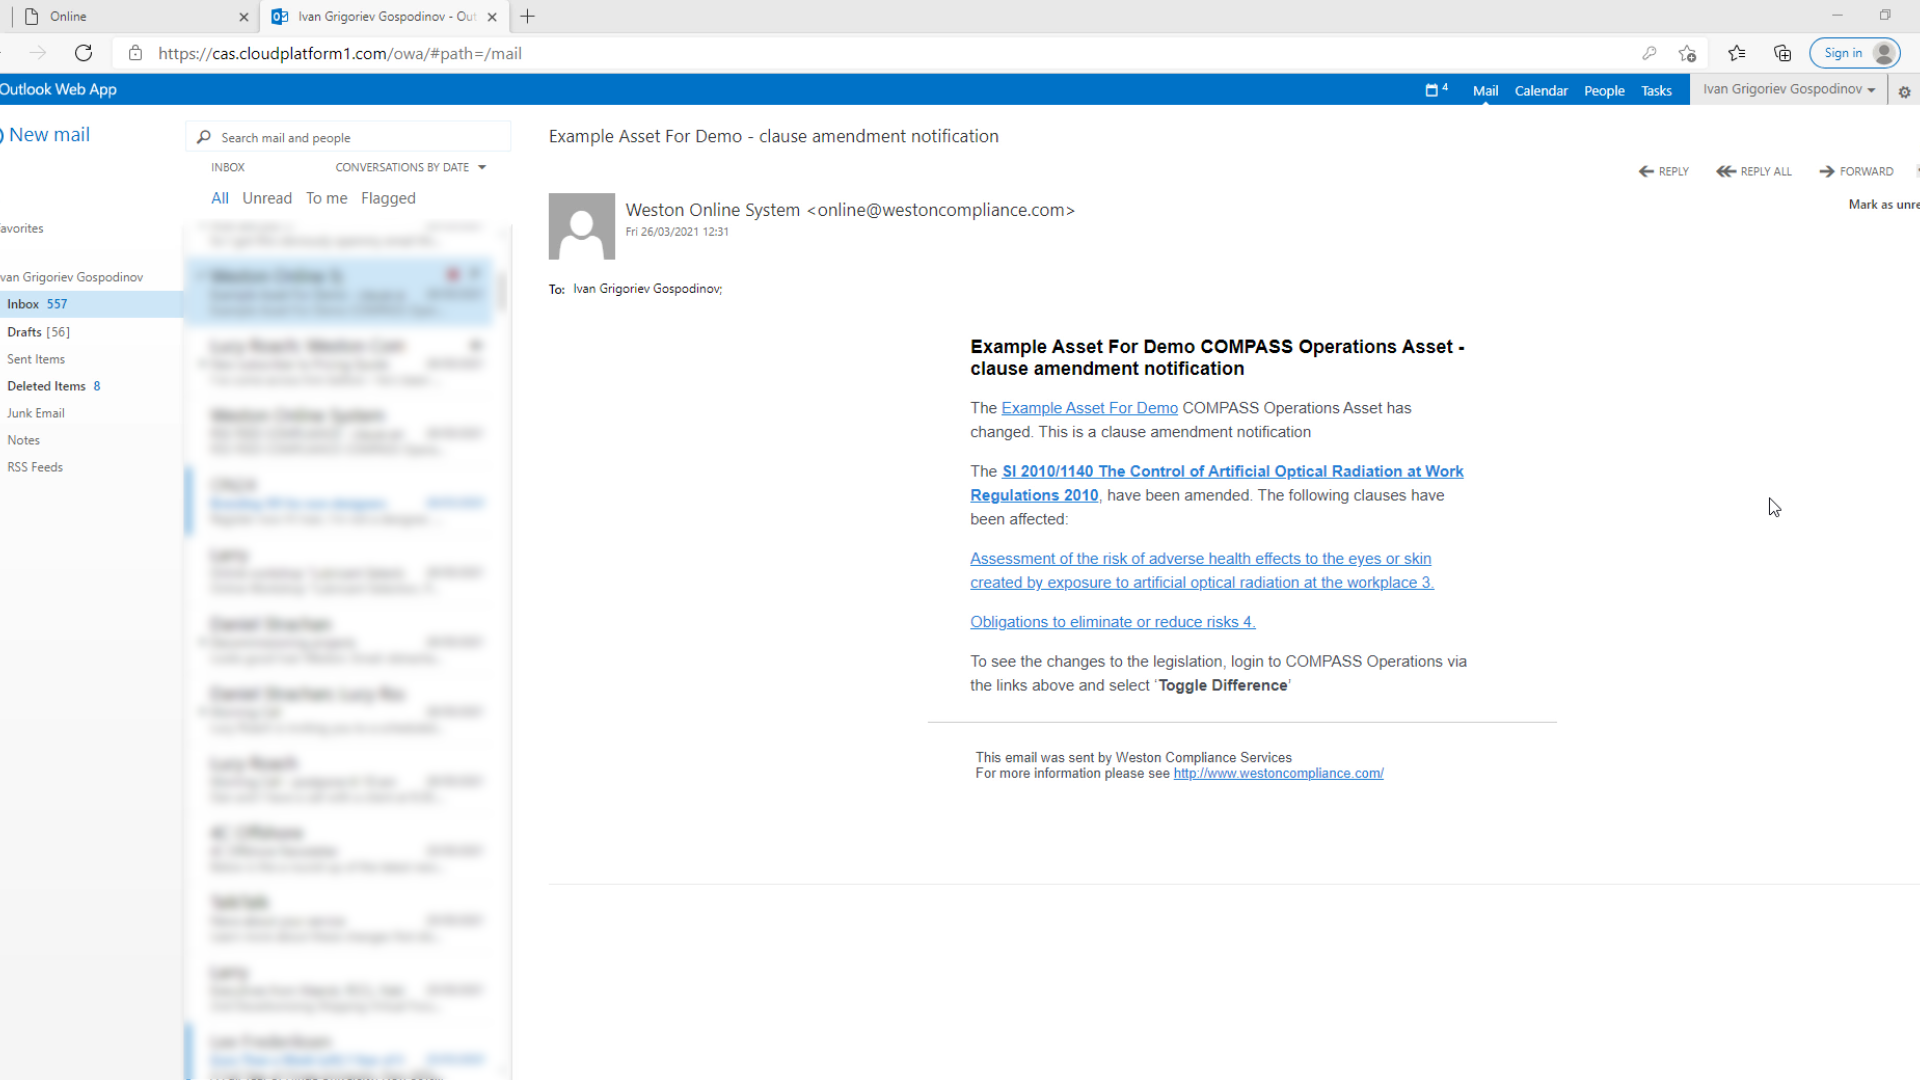
4) In addition to the information on the COMPASS Overview screen, the system will also send out an automated email notification to all users who are affected by the specific amendment.
(0:52)
5) The email notification contains the title of the regulation effected;

(0:56)
6) and the clauses that have been amended.

(1:00)
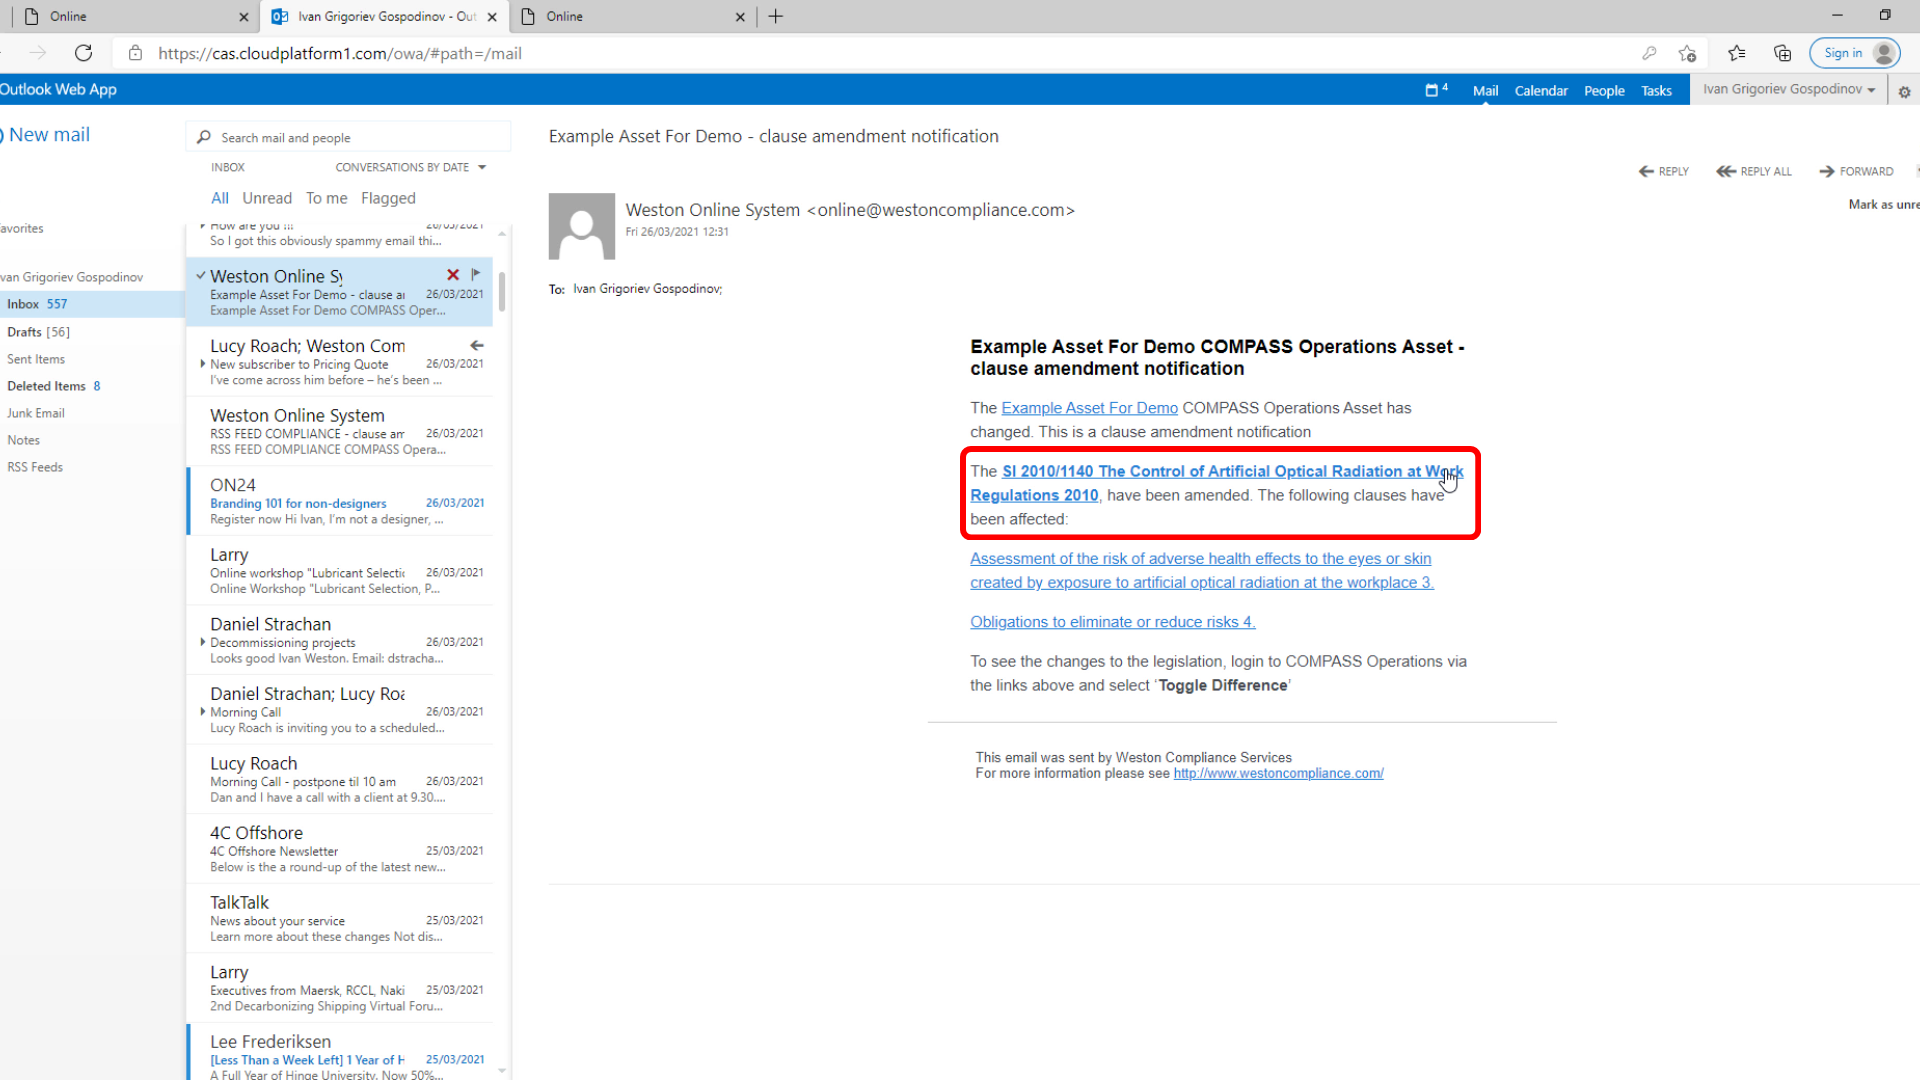
7) Clicking on one of the clases will take you directly to the amended clause within clauses compliance screen.

(1:06)
8) There you will see the status showing as amended.

(1:12)
9) Alternatively, clicking on the title will take you to the admin page of the regulation.
(1:19)
10) Then, by selectng the Clauses Compliance, you can see the full list of clauses with status showing as amended.


(1:17)
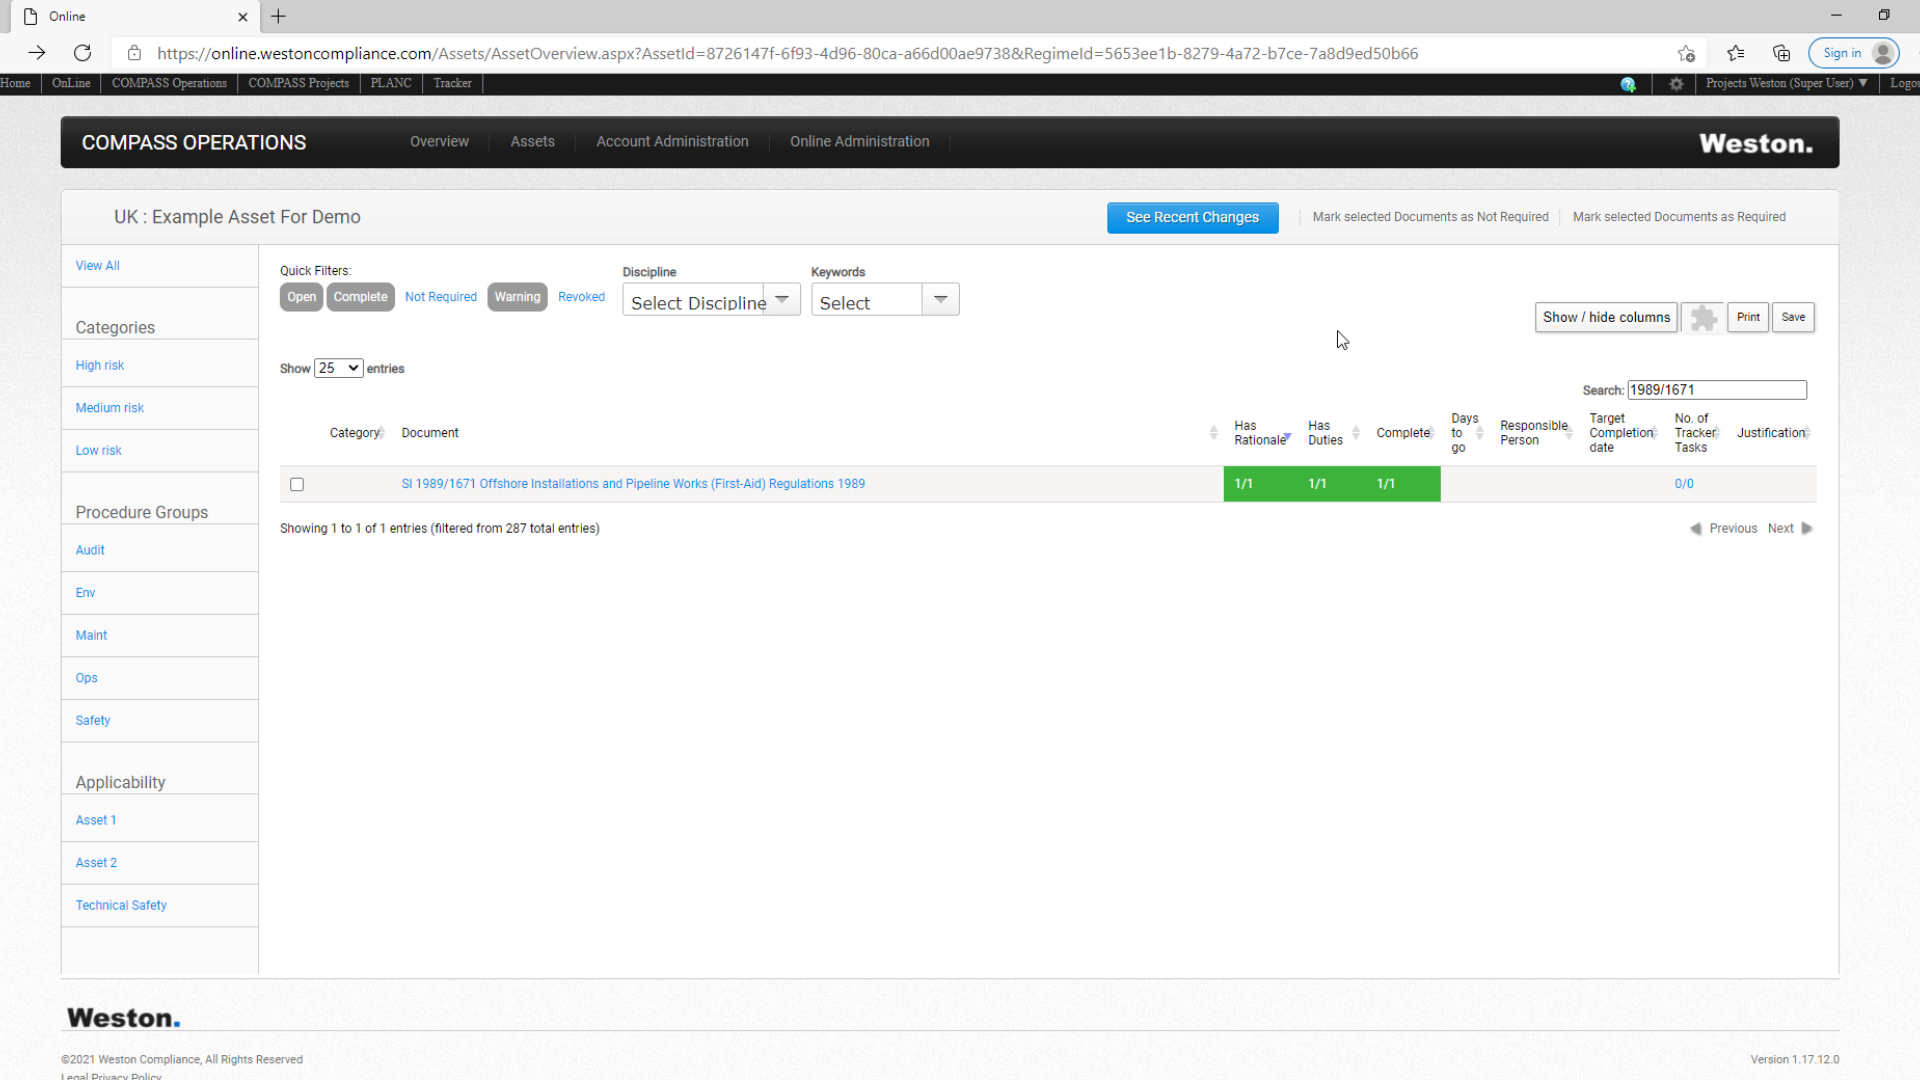
11) For the purpose of this session, we are going to use the SI 1989/1671 Offshore Installations and Pipeline Works (First-Aid) Regulations, as an example.

(1:50)
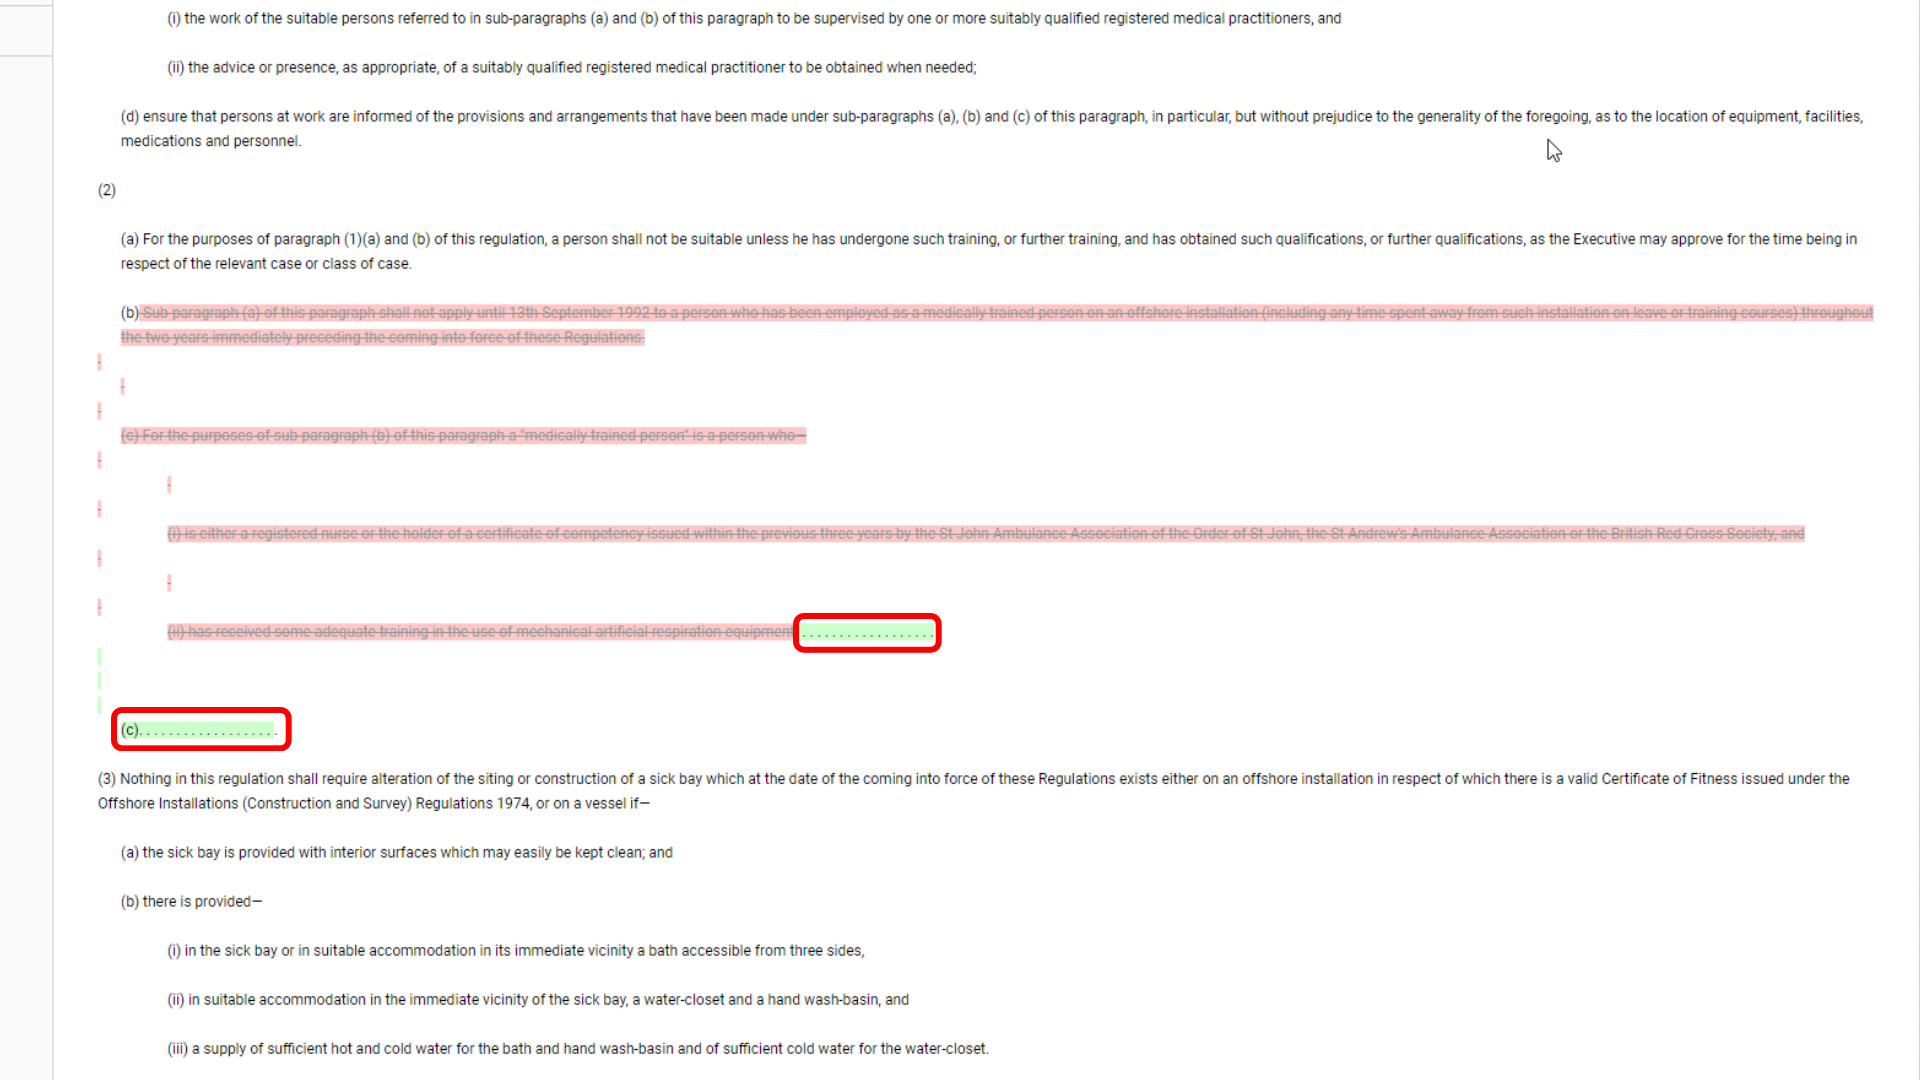
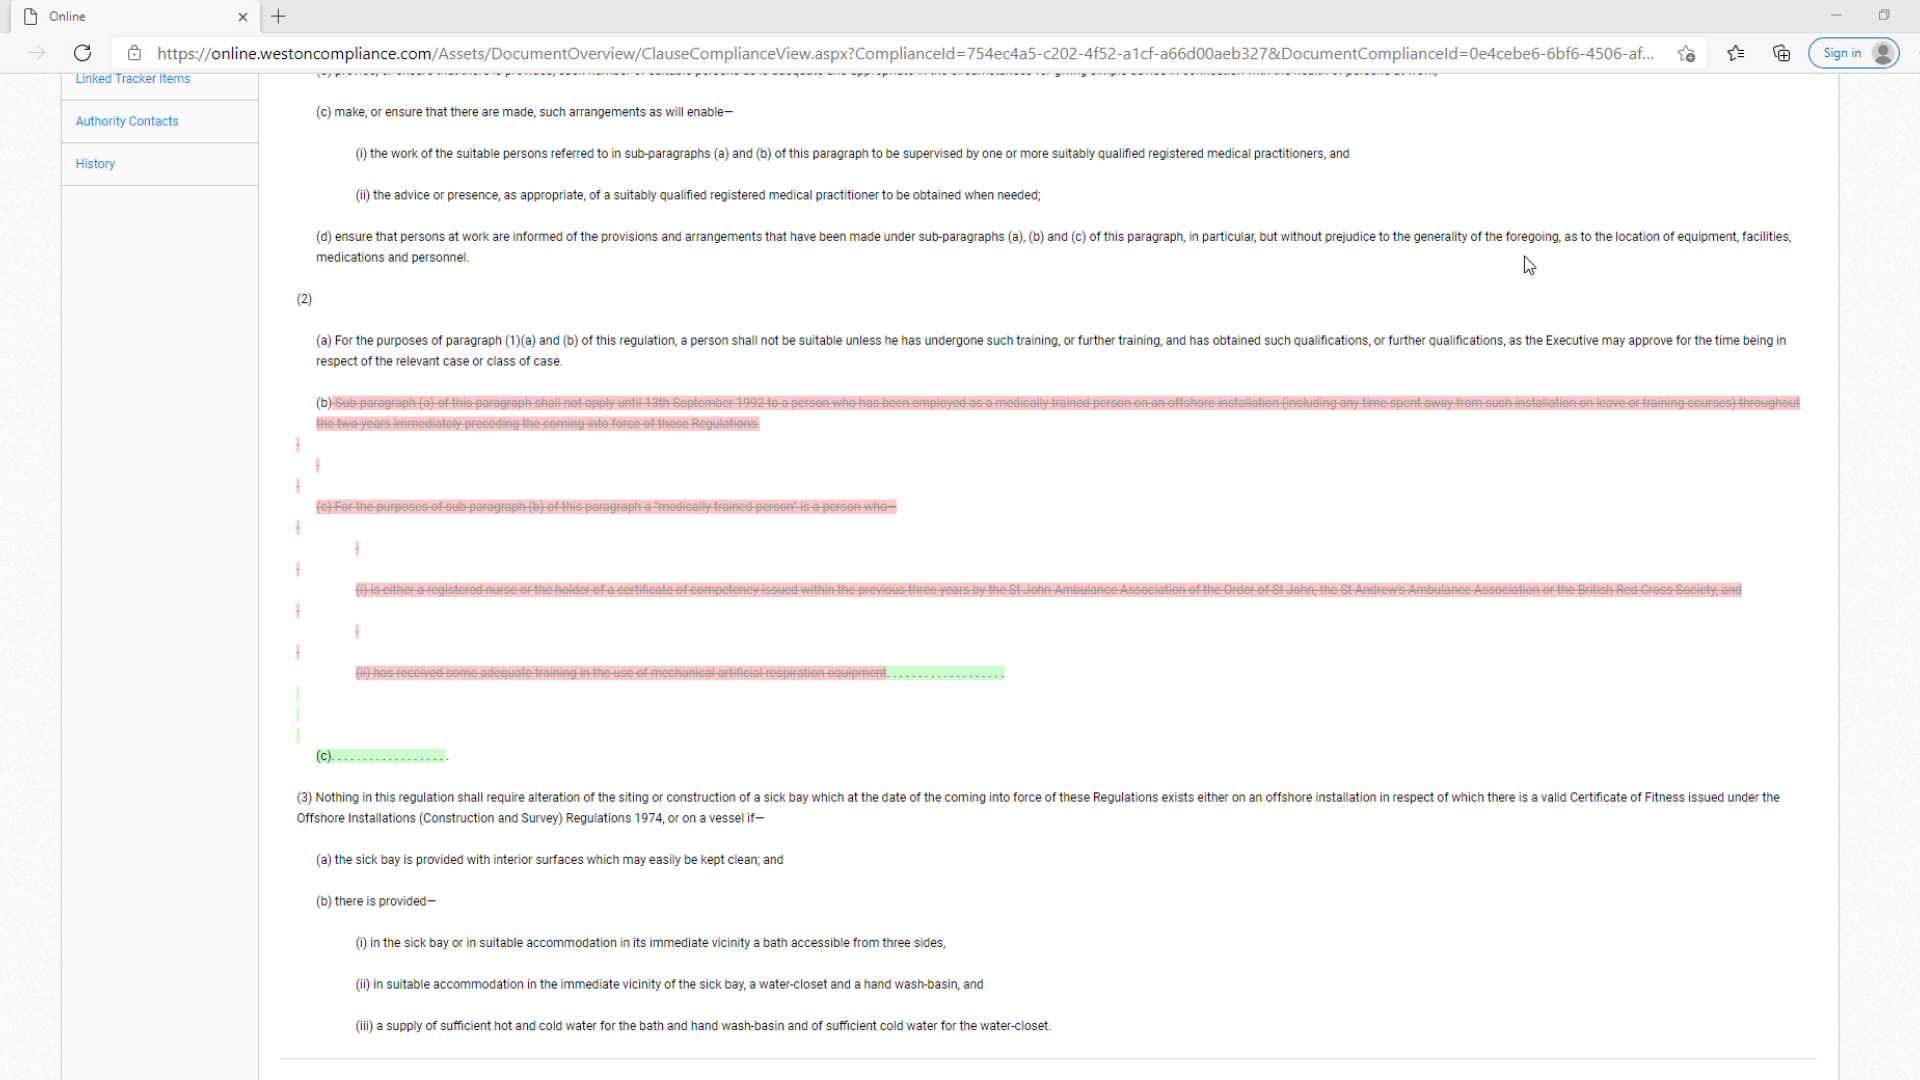
12) To view the amended text, click on the Clause. Open the Legislation tab and then click the Toggle Difference function on the top right of the screen to display marked-up changes.

(2:04)
13) Text highlighted in green shows what has been added.
(2:09)
14) Whereas text highlighted in red shows what has been removed.

(2:15)
15) The user now needs to review these changes and assess the impact on the organisation's activities and the compliance evidence that has already been referenced.
(2:27)
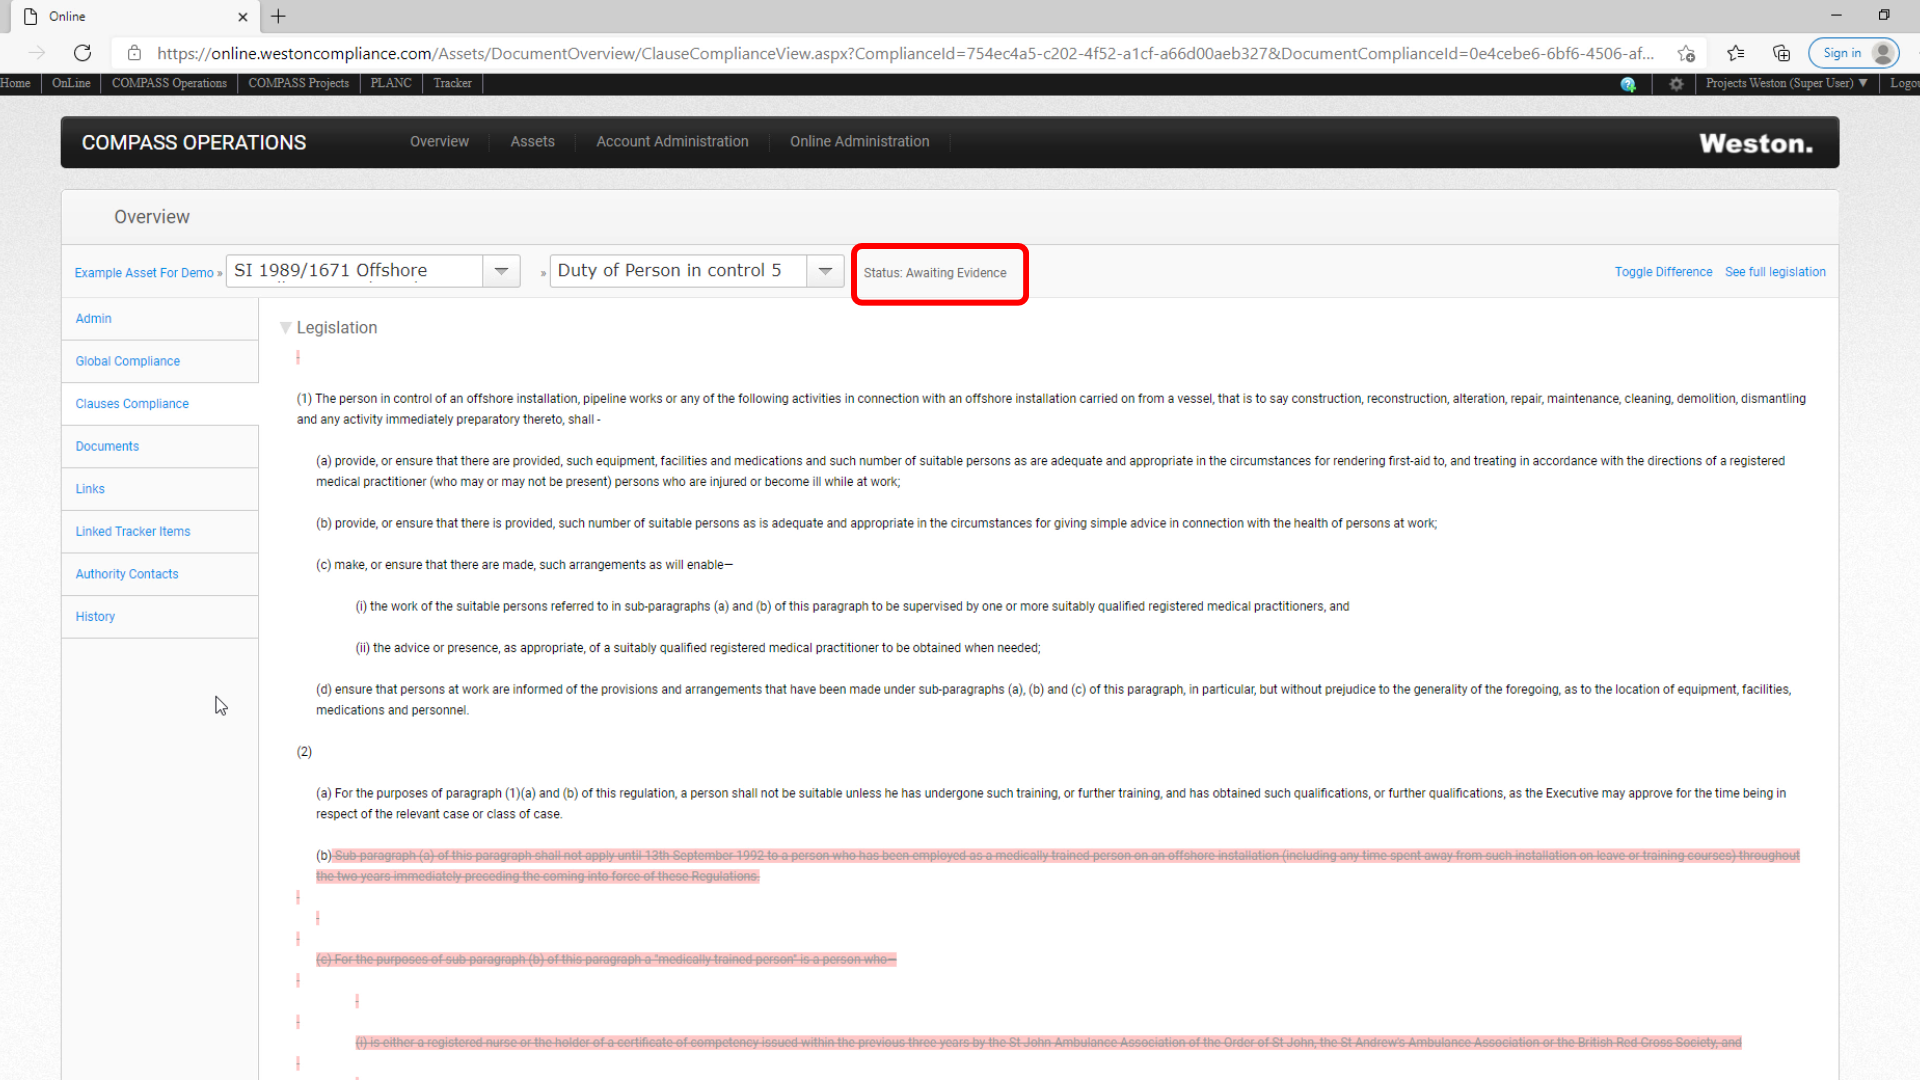
16) To begin working on an amended clause you will first ned to click the "Re-open Clause" function at the bottom of the screen.

(2:41)
17) This will change the status of the clause from "Amended" to "Awaiing Evidence".
(2:47)
18) If it's assessed that there is no impact from the amendment, then the Clause can simply be re-marked as Complete. This can be done by clicking the "Complete Clause" button at the bottom of the screen.

(3:01)
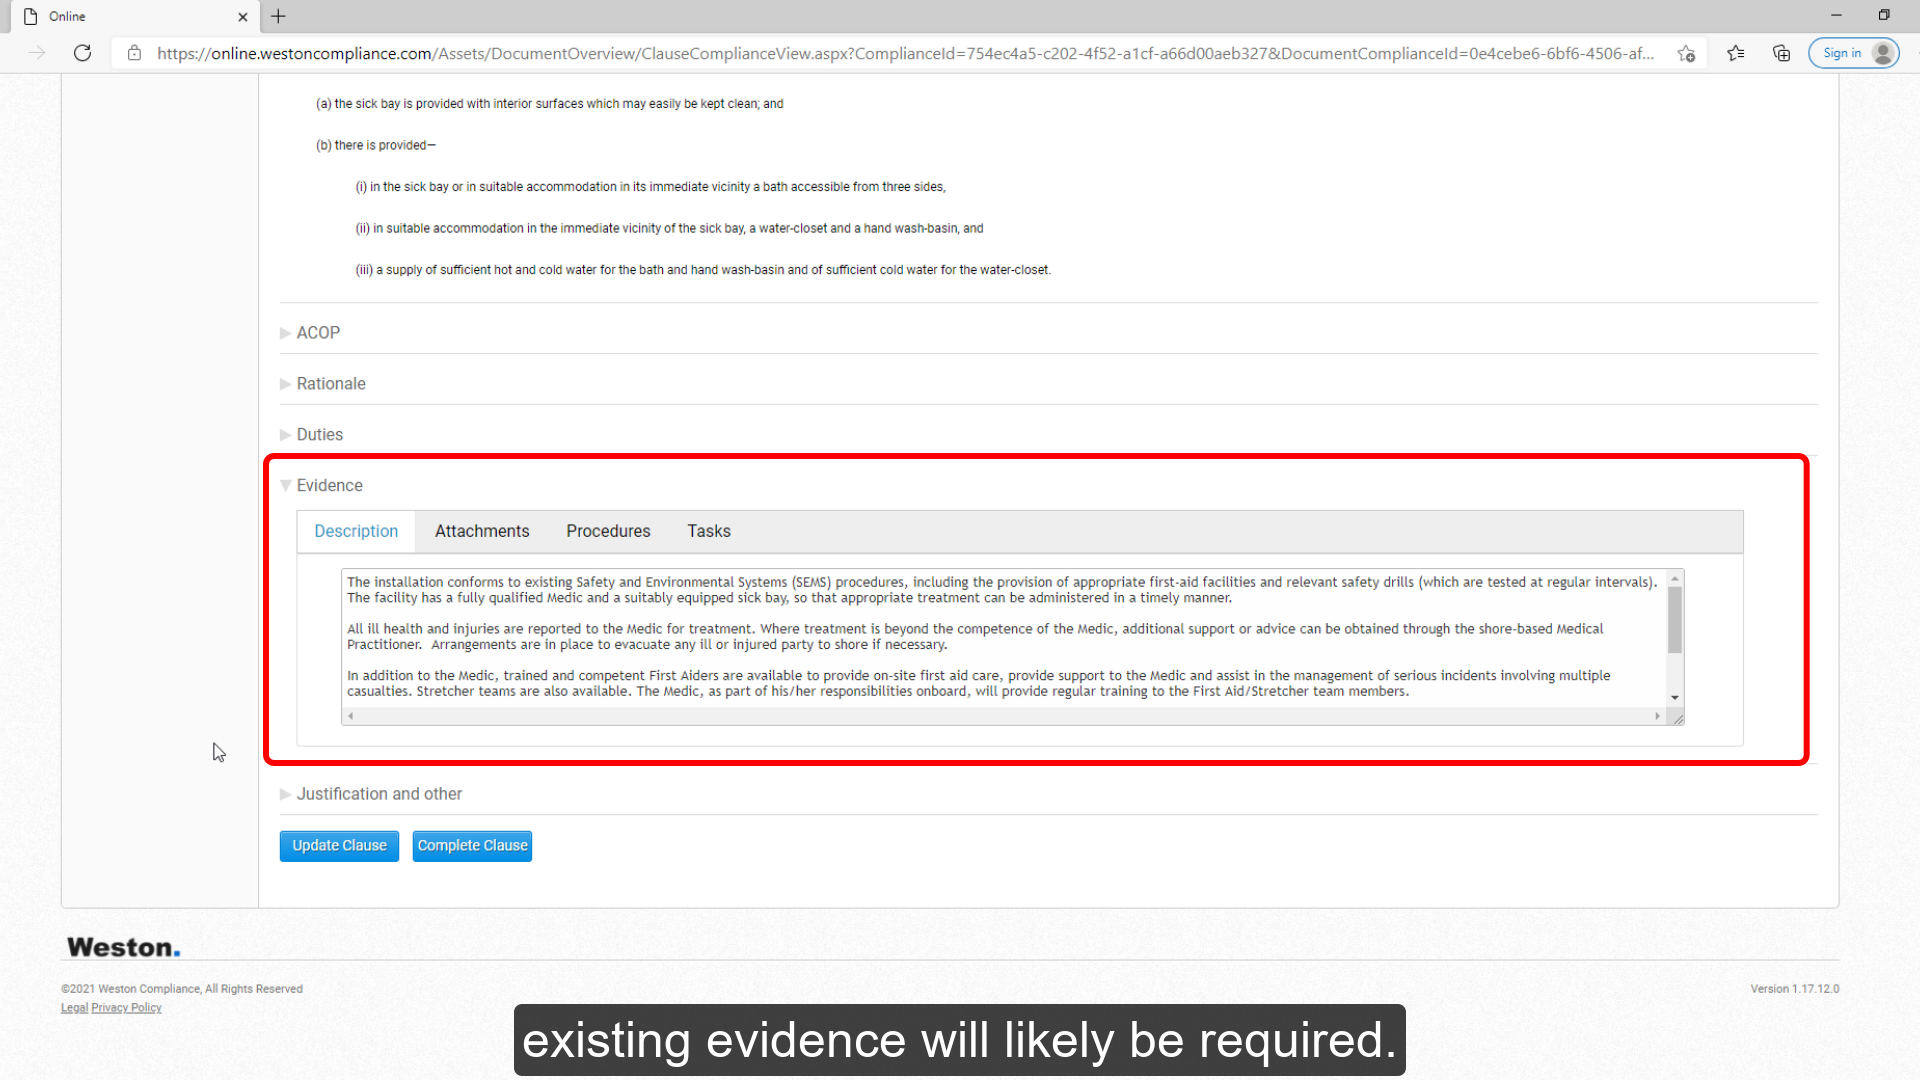
19) If the amendment does cause an impact, then an update to the existing evidence will likey be required. For example, a procedure may need to be updated or a new procedure developed.
(3:14)
20) Once the Evidence has been updated you must remember to click "Update Clause" to save the changes.

(3:22)
21) If the new evidence now satisfies the amended legislative requirement and you wish to commit it to the system, then click the "Complete Clause" button.

(3:35)
22) After doing so, we can see that the clause we just updated is marked with a status "Completed".

(3:43)
23) We can also see the date, when the update has taken place.

(3:48)
24) When we go back to the COMPASS Overview screen, we can now see that our example regulation no longer has a warning symbol against it and is complete column is green again. This shows us that we have taken all the steps necessary to ensure that we are compliant with the amended clauses.